
In this blog post, you’ll learn how to create a reusable Sysdig Secure image scanning task, for Tekton pipelines and Openshift clusters, that can be deployed in many pipelines.
As a DevOps engineer, you want to deliver applications fast but keeping compliance with security standards like CIS, PCI DSS or NIST 800-190, GDPR can be an arduous task.
You might implement image scanning in your CI/CD pipelines to detect and resolve issues such as known vulnerabilities and incorrect configurations. However, you may need to customize each script differently for many pipelines; that’s a burden, introduces uncertainty and is prone to errors.
Tekton is a cloud-native continuous integration and delivery (CI/CD) tool with a focus on reusing pipeline tasks. It does so by accelerating the integration of tools like Sysdig Secure image scanning on those many pipelines to quickly enable the compliance of security posture policies.
Save time securing many CI/CD Tekton pipelines reusing a single Sysdig Secure image scanning task Click to tweetThis article has been co-written by Marc Chisinevski, who previously wrote an excellent tutorial “Tekton Pipeline with Sysdig Secure image scans on OpenShift 4.2+” on his GitHub account.
Tekton pipelines
Tekton is a Kubernetes-native open-source framework by Google that is designed for creating continuous integration and delivery (CI/CD) systems. Being Kubernetes-native means that unlike other CI/CD stacks, like Jenkins, Circle-CI, Gitlab CI/CD, Azure Pipelines, AWS CodePipeline and CodeBuild, and GitHub actions, Tekton is built with cloud-native concepts as its foundation. For example, it runs directly on your cluster and every Tekton element is a Kubernetes custom resource.
One of Tekton’s outstanding features is its focus on reusing components. You can define general tasks that can be reused by instantiating them in several different pipelines, connecting them to different input and output resources.
Anatomy of a Tekton pipeline
Tekton defines a handful of Kubernetes resources that you’re going to use to build the pipeline:
A CI/CD Pipeline in Tekton instantiates Tasks that are made of several Steps. The pipeline has PipelineResources that serve as inputs and output to tasks. Those Tasks can be instantiated in a different Pipeline, using different PipelineResources. A ServiceAccount executes the Pipeline, creating a PipelineRun. You can find more information in the official documentation.

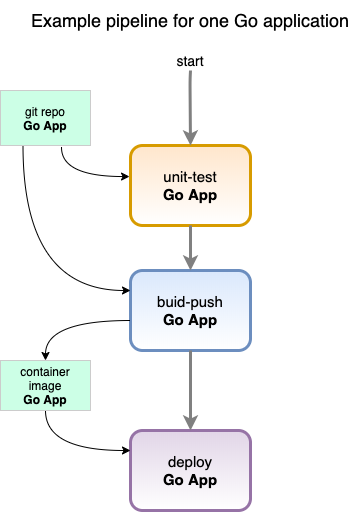
Tekton tasks are generic, take input and output resources, execute steps as container images and can be reused for several pipelines. Here are some example tasks:
- unit-test: Run unit tests for a repo.
- Input: A git repository
- build-push: Uses Kaniko to build and push an image to a repository.
- Inputs: A git repository
- Output: A built container image
- deploy: Deploys an image to the cluster.
- A container image
We instantiate and interconnect these tasks to build a pipeline, for example, for a specific Go application repository to build and push its image to our registry and deploy it to the cluster. That’s if every step is executed without problems.
A Tekton task for Image Scanning
We’re going to create a new Tekton task, for image scanning with Sysdig Secure, that you can reuse in any pipeline definition:
- scan-image: Using Sysdig Secure to scan the image, stopping the pipeline on non-compliance of security policies.
- Input: A container image
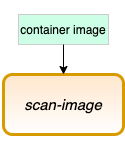
The definition of the scan-image task is:
apiVersion: tekton.dev/v1alpha1
kind: Task
metadata:
  name: scan-image
spec:
  inputs:
    resources:
    - name: image
      type: image
  steps:
  - name: scan-image-step
    image: sysdiglabs/secure-image-scanning:latest
    env:
    - name: IMAGE_TO_SCAN
      value: $(inputs.resources.image.url)
    - name: SYSDIG_SECURE_TOKEN
      value: <your_sysdig_secure_token>
As you can see, it requires a resource of type image as input and has a single step. That step has a name and an image that encapsulates its execution. In this case, it’s sysdiglabs/secure-image-scanning:latest, to which parameters are passed as environment variables for the URL of the image to scan and your Sysdig Secure API token to identify your account.
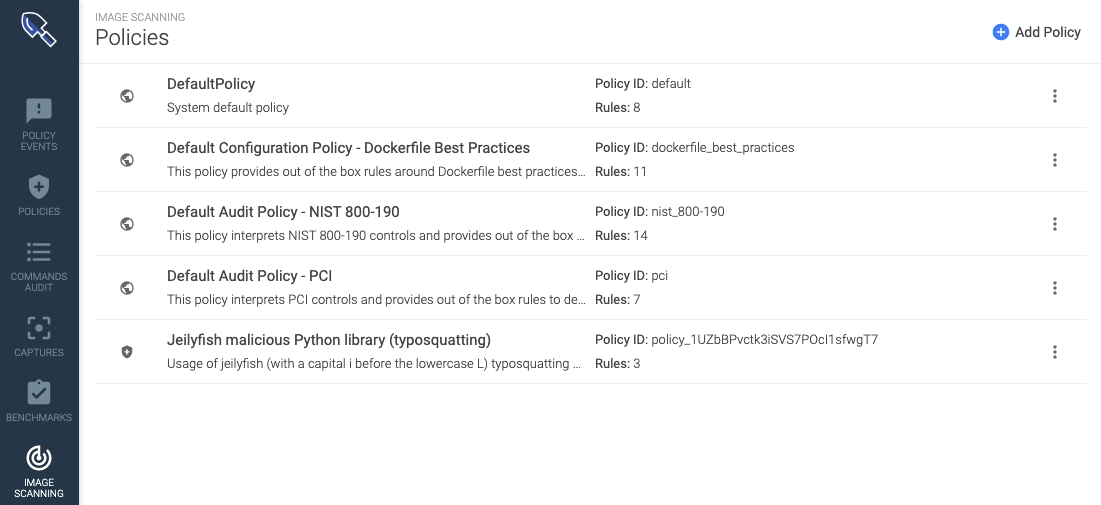
As this image scanning step is leveraging your Sysdig Secure account, all of the default compliance image scanning policies for CIS, PCI or NIST that you already find active in your account are taken into consideration, as well as those custom policies you define yourself.
Example pipeline definition using image scanning
We’re also going to build a slightly more complex pipeline that better exemplifies how tasks are reused. To do that, you will use two microservices applications that are part of the Skaffold project available at their repository:
- Microservice 1: leeroy-app
- Microservice 2: leeroy-web
These are just a couple of small go projects that print a line and expose that output with a web server. It’s nothing too complex.
As both microservices live in the same code repository, we can use a single unit-test task for both of them. However, the tasks to build and deploy are going to run in parallel for each microservice. We will also insert the new scan-image task before deployment in hopes of stopping it if a vulnerability is detected.
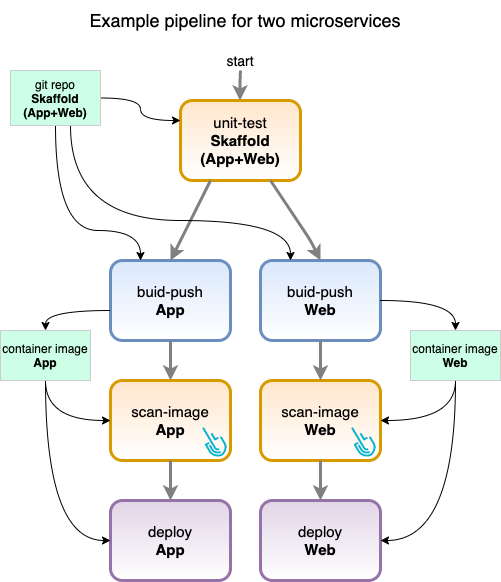
So, using the generic tasks we have defined before, the concrete pipeline that you’re going to build uses them in the following way:
Tasks instances in the pipeline:
- unit-test: Task “unit-test”, for both App and Web on the same repo
- build-app: Task “build-push”, for App, to be executed after uni-test
- build-web: Task “build-push”, for Web, to be executed after uni-test
- scan-app: Task “scan-image”, for App, to be executed after build-app
- scan-web: Task “scan-image”, for Web, to be executed after build-web
- deploy-app: Task “deploy”, for App, to be executed after scan-app
- deploy-web: Task “deploy”, for Web, to be executed after scan-web
You can find the full code for the pipe line here. At the beginning, it includes container registry credentials, service account definition to execute the pipeline and its role, the generic tasks including the new scan-image one, and then the pipeline definition, resources and PipelineRun to execute it.
Openshift
For this example we will use OpenShift, an open-source orchestrator from Red Hat, built on top of Kubernetes, that focuses on security and incorporates many ready-to-use enhancements.
Using it as a commercial product, you can install OpenShift in your infrastructure and get support from Red Hat, an organization with a long history of developing server software.
While Kubernetes has various general definitions in which you can plug in different software for implementation, OpenShift comes out-of-the-box with everything you need to run a production-ready cluster.
In addition to Role-Based Access Control (RBAC), OpenShift incorporates Security Context Constraints (SCC) with extended features. It also uses Routers with HAProxy that are more mature than generic Kubernetes’ Ingress, as well as ImageStream for a better container image lifecycle management. Networking leverages the robust implementation of Open vSwitch, an open-source multilayer virtual switch. In general, user experience for administrators is more seamless since you don’t require separate tools or install additional plugins to manage the cluster.
Install OpenShift locally using Red Hat CodeReady Containers
To be able to use it to test these examples on your local machine, and avoid spending cloud resources, we will explain how to install OpenShift locally using Code Ready Containers (CRC). It’s a specific installation package for development that is easy to install and is tuned to consume fewer resources on a development machine than a full OpenShift installation.
Visit Red Hat’s Code Ready Containers page here and register to download the installation package, as well as the pull-secret.txt file to deploy it. Follow the official documentation instructions to install it, that can be summarized as:
- Download crc.tar.xyz/crc.zip compressed file.
- Uncompress it and move the crc to a folder in your path.
- Run crc setup.
- Add
$HOME/.crc/binto your path to be able to use theoccommand (it substitutes kubectl for OpenShift). - Run
crc start --pull-secret-file pull-secret.txt. - You will be indicated in the log message how to log as kubeadmin for the created cluster, it will be something like this:
oc login -u kubeadmin -p <your_password> https://api.crc.testing:6443
Depending on your computer operating system, several additional steps may be involved. Consult the mentioned documentation.
To check that everything works, run this command and verify that your versions are at least as high as these:
$ oc version && crc version
Client Version: v4.4.0
Server Version: 4.3.0
Kubernetes Version: v1.16.2
crc version: 1.6.0+8ef676f
OpenShift version: 4.3.0 (embedded in binary)
Install Tekton
To deploy Tekton, you’re going to create a new OpenShift project (it involves the creation of a new Kubernetes namespace), add the tekton-pipelines-controller permissions of anyuid and apply the remote hosted manifest.
oc new-project tekton-pipelines
oc adm policy add-scc-to-user anyuid -z tekton-pipelines-controller
oc apply --filename https://storage.googleapis.com/tekton-releases/pipeline/latest/release.notags.yaml
anyuid is a capability that enables the tekton-pipelines-controller account administrator privileges, so it can deploy the required resources for Tekton in the tekton-pipelines namespace.
Optionally, you could deploy a web dashboard to check the state of pipelines and runs in your browser, using:
oc apply -f https://storage.googleapis.com/tekton-releases-nightly/dashboard/latest/openshift-tekton-dashboard-release.yaml --validate=false
oc get route tekton-dashboard -n tekton-pipelines
The last command will show you the domain to use for accessing the dashboard. It will be similar to:
http://tekton-dashboard-tekton-pipelines.apps-crc.testing
Prepare Pipeline definition
Already using Sysdig?
We actively support the Tekton inline scanning integration.
Find the most up to date details in the documentation page →
To prepare the pipeline definitions, you’re going to need to download locally and edit several files:
wget https://raw.githubusercontent.com/marcredhat/crcdemos/master/sysdig/sysdigpipeline.yaml
wget https://raw.githubusercontent.com/marcredhat/crcdemos/master/sysdig/sysdigpipelineblock.yaml
Let’s take a look at the sysdigpipelineblock.yaml file again. You will see the Sysdig Secure task we have mentioned, as well as the other kind of Tekton elements. It also has a secret definition to authenticate to Docker to push built images.
Edit sysdigpipeline.yaml and sysdigpipelineblock.yaml to the following:
- Replace your docker registry credentials in the
<username>and<password>fields at the beginning of the file. To use different authentication schemes, read more at the official Tekton documentation here. - Replace with the remote registry URL for the leeroy-app image:
gcr.io/christiewilson-catfactory/leeroy-app - Replace with the remote registry URL for the leeroy-web image:
gcr.io/christiewilson-catfactory/leeroy-web - Replace your Sysdig API key in:
<REPLACE WITH YOUR TOKEN>
The sysdigpipelineblock.yaml file is equivalent to sysdigpipeline.yaml, but instead of scanning the previously built image, it’s fixed to scan a known, vulnerable image definition that should never validate an image scanning process.
Deploy and run the Pipeline
When everything is prepared, you can deploy the pipeline with:
oc create -f sysdigpipeline.yaml
And check its progress with:
oc get pods

NAME                                                      READY   STATUS    RESTARTS   AGE
demo-pipeline-run-1-skaffold-unit-tests-gxwmq-pod-k2qhk   2/2     Running   0          30s
tekton-dashboard-77f5d8994b-ckhmk                         2/2     Running   1          7h17m
tekton-pipelines-controller-8564689cff-xcp75              1/1     Running   0          7h17m
tekton-pipelines-webhook-56b4b768c5-szxlg                 1/1     Running   0          7h17m
While the pods are being executed, you will see each task create a pod. Inside of it, a container will be created for each step. They will end in a state of “Completed” if everything went well, or “Error” otherwise.
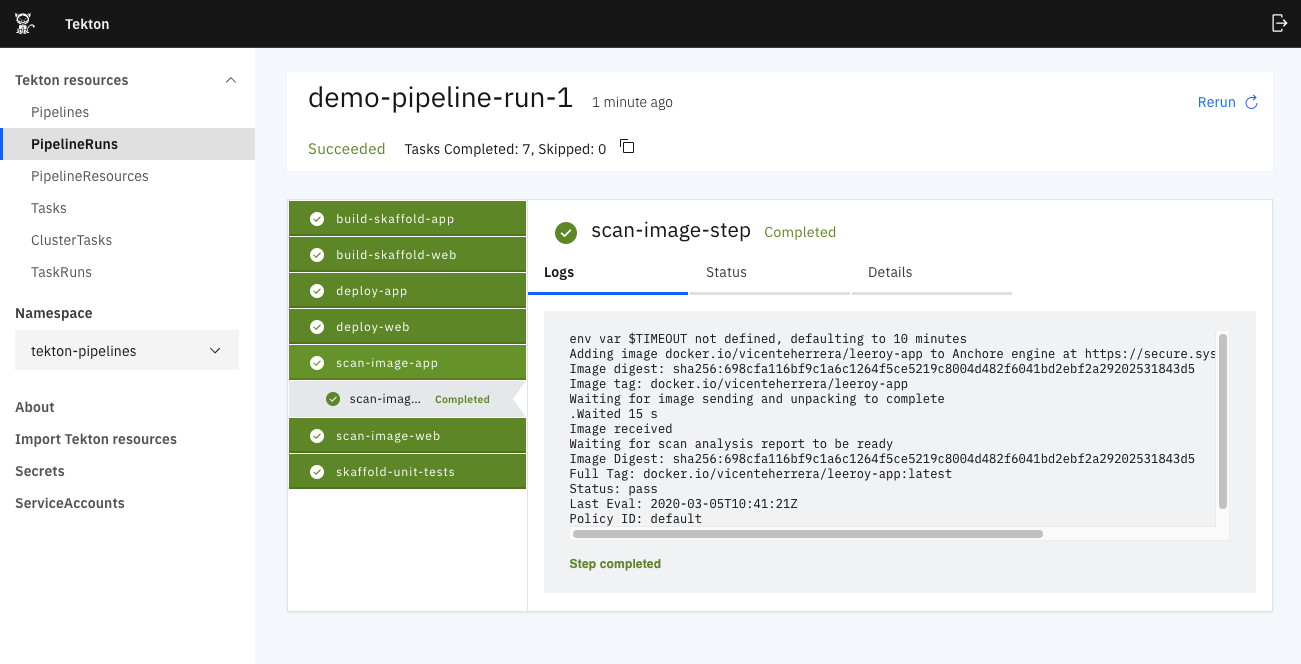
When the execution finishes successfully, you can see all the pipeline pods are in state “Completed”:
To check the log on any pod and observe all of its output, use:
oc logs demo-pipeline-run-1-scan-image-app-nwml6-pod-c6tt4

{"level":"info","ts":1583344980.0405614,"logger":"fallback-logger","caller":"logging/config.go:69","msg":"Fetch GitHub commit ID from kodata failed: \"KO_DATA_PATH\" does not exist or is empty"}
env var $TIMEOUT not defined, defaulting to 10 minutes
Adding image docker.io/vicenteherrera/leeroy-app to Anchore engine at https://secure.sysdig.com/api/scanning/v1/anchore
Image digest: sha256:cff29b270cfb0d5c37751073eb0d51165b7ec74e616b1a0e1295386350a25933
Image tag: docker.io/vicenteherrera/leeroy-app
Waiting for image sending and unpacking to complete
Image received
Waiting for scan analysis report to be ready
...
Waited 35 s
Image Digest: sha256:cff29b270cfb0d5c37751073eb0d51165b7ec74e616b1a0e1295386350a25933
Full Tag: docker.io/vicenteherrera/leeroy-app:latest
Status: pass
Last Eval: 2020-03-04T18:23:07Z
Policy ID: default
Policies you have set up in your Sysdig Secure account are taken into consideration for the scan and also check the result in Sysdig Secure, as we will discuss in a later section.
If you prefer to navigate the Tekton dashboard, you will also find easy access to all logs for tasks and steps.
Running the pipeline with vulnerable images
To run the pipeline with vulnerable images, you must first delete our current pipeline run so they don’t get mixed up. Also, wait until the only pods you see are those of the Tekton pipelines and dashboard themselves.
oc delete -f sysdigpipeline.yaml
Then, if you run the pipeline, sysdigpipelineblock.yaml, with vulnerable images, the result will be:
oc get pods

NAME                                                      READY   STATUS    RESTARTS     AGE
demo-pipeline-run-1-build-skaffold-app-rt4c6-pod-5zd8r    0/4     Completed   0          19m
demo-pipeline-run-1-build-skaffold-web-dsfd5-pod-xznpk    0/4     Completed   0          19m
demo-pipeline-run-1-scan-image-app-6jnrh-pod-487p5        0/1     Error       0          17m
demo-pipeline-run-1-scan-image-web-mqnnl-pod-9h4xv        0/1     Error       0          17m
demo-pipeline-run-1-skaffold-unit-tests-gnnrh-pod-697pj   0/2     Completed   0          20m
tekton-dashboard-77f5d8994b-ckhmk                         2/2     Running     1          8h
tekton-pipelines-controller-8564689cff-xcp75              1/1     Running     0          8h
tekton-pipelines-webhook-56b4b768c5-szxlg                 1/1     Running     0          8h
The log of a failed scan will resemble this:
oc get logs demo-pipeline-run-1-scan-image-app-6jnrh-pod-487p5

{"level":"info","ts":1583347195.6537874,"logger":"fallback-logger","caller":"logging/config.go:69","msg":"Fetch GitHub commit ID from kodata failed: \"KO_DATA_PATH\" does not exist or is empty"}
env var $TIMEOUT not defined, defaulting to 10 minutes
Adding image quay.io/marcf5/mltitanic to Anchore engine at https://secure.sysdig.com/api/scanning/v1/anchore
Image digest: sha256:6ceaa66e80586fca952eaa6436ce7497a476a4556272eff6da679eb79d142a09
Image tag: quay.io/marcf5/mltitanic
Waiting for image sending and unpacking to complete
Image received
Waiting for scan analysis report to be ready
...............
Waited 625 s
Image Digest: sha256:6ceaa66e80586fca952eaa6436ce7497a476a4556272eff6da679eb79d142a09
Full Tag: quay.io/marcf5/mltitanic:latest
Status: fail
Last Eval: 2020-03-04T18:58:05Z
Policy ID: default
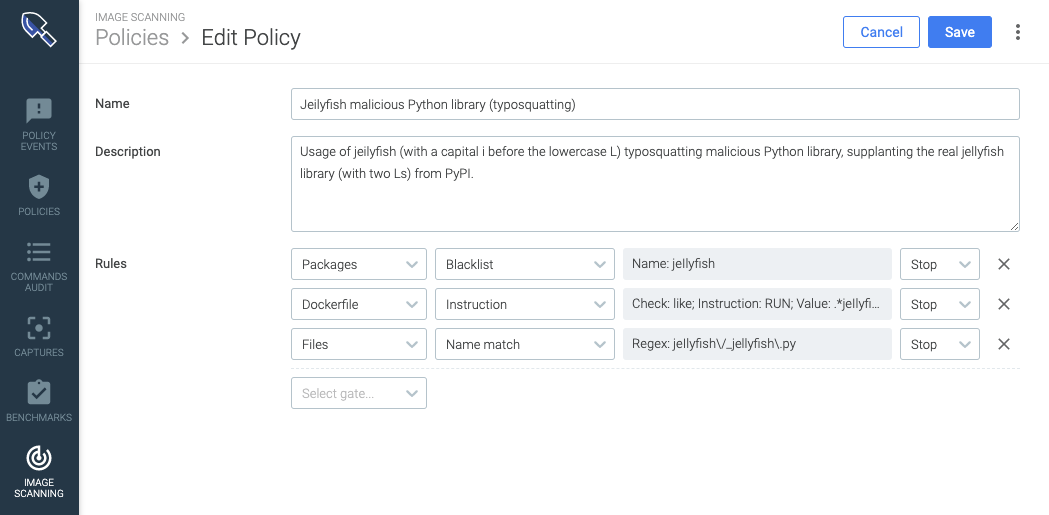
Setting up policies and browsing results in Sysdig Secure
When you scan the images in the pipeline, you are using a private token to identify your account. That allows you to create your own policies in your Sysdig Secure account, defining several gates to scan the image for specific vulnerable packages or configurations, ultimately blocking it in the CI/CD pipeline.
The image scanning reports for the images scanned in the pipeline are logged and available online on your Sysdig Secure account. Access it to review them in detail, including historic information about how with successive scans, the security benchmark of the image has been evolving in time.

Conclusion
Tekton is a cloud-native, open-source and continuous integration and delivery (CI/CD) system. It’s specifically tailored for Kubernetes and focused on reusable tasks. Using Tekton in conjunction with OpenShift, as an orchestrator, you can quickly build completely cloud-native pipelines.
Add a Sysdig Secure image scanning task to all of your pipelines to easily find known vulnerabilities and validate configuration against security best practices. This way, you can easily report on regulatory compliance against security frameworks like CIS, PCI DSS or NIST 800-190 or GDPR. Try Sysdig Secure today!