
Scanning a container image for vulnerabilities or bad practices on your GitHub Actions using Sysdig Secure is a straightforward process. This article demonstrates a step-by-step example of how to do it.
The following proof of content showcased how to leverage the sysdig-cli-scanner with GitHub Actions. Although possible, it is not officially supported by Sysdig, so we recommend checking the documentation to adapt these steps to your environment.
This blog post is focused on the vulnerability scanner available since April 2022. If you are using the legacy scanner, see the official documentation for more information about it.
You can go straight to the pipeline definition here.
Image vulnerability scanning with Sysdig Secure
Image scanning allows DevOps teams to shift security left by detecting known vulnerabilities and validating container build configuration early in their pipelines before the containers are deployed in production, or images are pushed into any container registry. This allows detecting and fixing issues faster, avoids vulnerabilities in production or credential leaks, and improves the delivery to production time, all in a much more secure way.
The Sysdig image scanning process is based on policies that can be customized to include different rules, including ImageConfig checks (for example, leakage of sensitive information) and checks for not just OS packages, but also third-party packages (java, python, etc.).
Sysdig vulnerability scanning classifies images differently depending on where the scanning procedure is performed:
- Pipeline: before the runtime phase (in the developer workstation, in a CI/CD pipeline, etc.) performed by the
sysdig-cli-scannertool - Runtime: when the image is running in the execution node and the scanning is performed by a Sysdig agent
In this article, we will cover how to perform scanning on the pipeline step using GitHub Actions, as it is a best practice to adopt.
Running the scanner against a container image is as simple as running the sysdig-cli-scanner tool with a few flags (see the official documentation for more information), such as:
SECURE_API_TOKEN=<your-api-token> ./sysdig-cli-scanner \
  --apiurl <sysdig-api-url> <image-name> --policy <my-policy>
The image is scanned locally on the host where the tool is executed, on your laptop or a container running the pipeline, and only the scanning results are sent to the Sysdig Secure backend.
Vulnerability scanning with GitHub Actions
GitHub Actions allow you to automate software development tasks directly in your Git repositories, creating powerful CI/CD (continuous integration/continuous delivery or deployment) workflows triggered by different events. A growing number of preexisting actions for the most common tasks can be found in the GitHub Marketplace, or you can create a customized workflow and write your own actions.
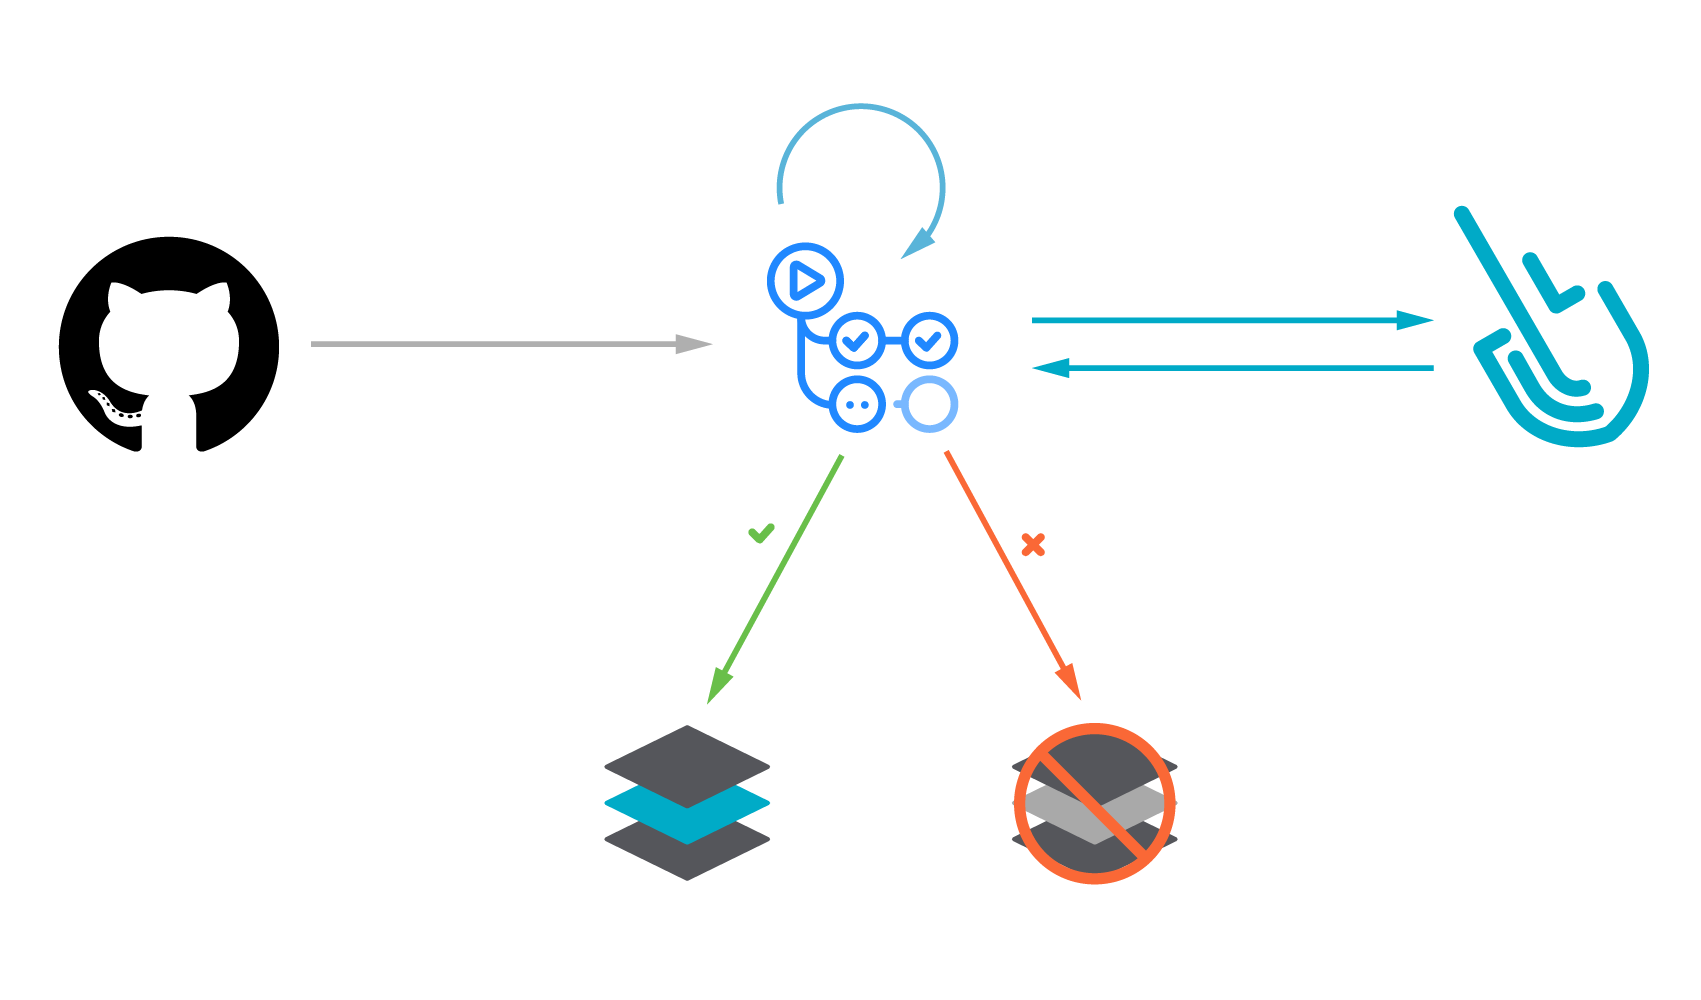
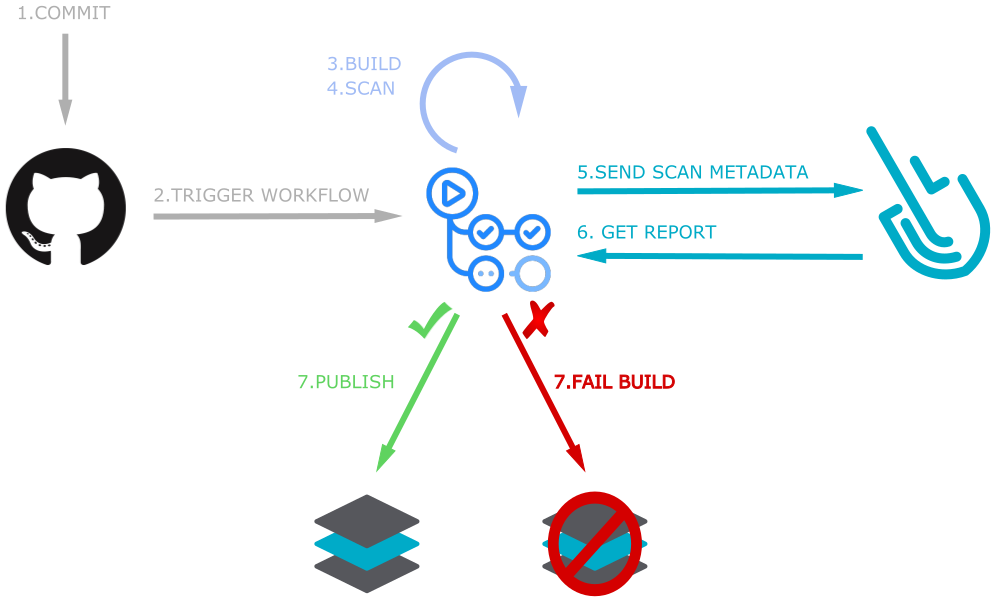
Image scanning has become a critical step in CI/CD workflows by introducing security earlier in the development process (security shift-left). Our workflow will build a container image, then it will locally scan the image using the sysdig-cli-scanner tool. The scan results will then be sent to Sysdig. If the scan fails, the workflow breaks, preventing the image from being uploaded into a registry.
Creating a GitHub Action
The versions used in this example are:
- Image: ubuntu-20.04 Version: 20220920.2
- Runner image provisioner: 1.0.0.0-main-20220916-1.
- Sysdig-cli-scanner version 1.2.8-rc (commit: 50a3840).
If using the legacy scanner, the pipeline definition is different. It requires the use of the sysdiglabs/scan-action@v3 action.
See an example provided in the sysdiglabs/secure-inline-scan-example repository.
Prerequisites
The requirements for getting Sysdig Image Scanning up and running are straightforward:
- A GitHub repository and administrative permissions, as they are required to enable Actions and to manage Secrets.
- A Sysdig Secure account where the results of the scans will be collected. You can request a free trial if you don’t have one.
- A container Dockerfile ready to be built. You can fork and use our example, but using your own container is more fun!
Once you are ready, let’s move on!
Enable GitHub Actions in your repository
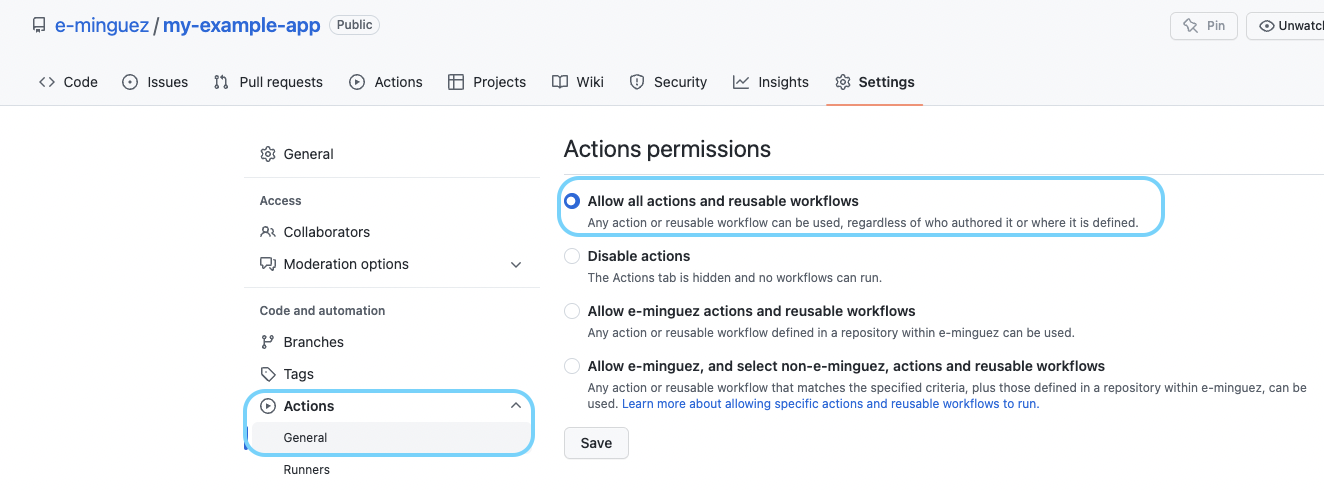
If you did not activate Actions for your repository, the first step is making sure they are enabled. Navigate to your repository Settings and look for the Actions section (https://github.com/<user>/<repo>/settings/actions).
There, make sure the Allow all actions and reusable workflows option is selected:
Once actions are enabled, you should get an Actions tab at the top navigation bar on your repository main page, like this:

Repository secrets
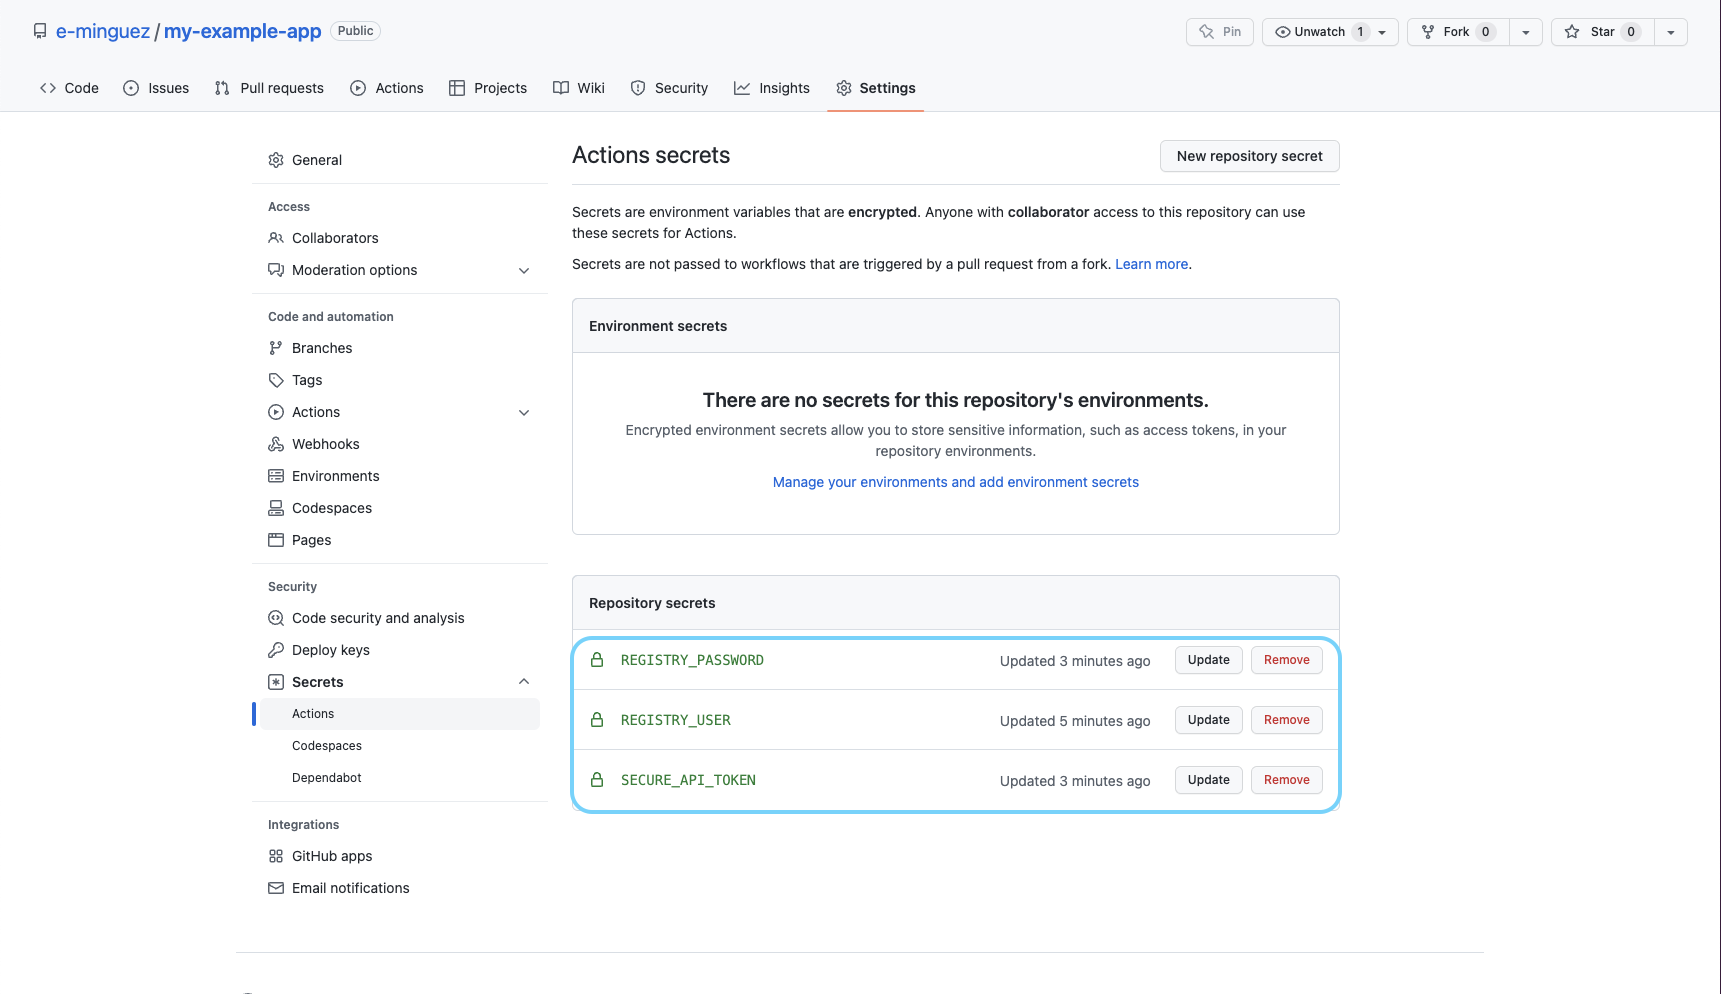
For sensitive data such as the registry password or the API token, it is recommended to create repository secrets instead in the repository Settings -> Secrets -> Actions -> “New repository secret”.

In this example we will use three repository secrets:
REGISTRY_USER: self-explanatoryREGISTRY_PASSWORD: self-explanatorySECURE_API_TOKEN: The Sysdig API token is required to query the Sysdig API and to send the scan results. See the official documentation for more information on how to get it.
Those variables will be referenced in the workflow using the syntax ${{ secrets.VARIABLE_NAME }}, such as ${{ secrets.REGISTRY_PASSWORD }}.
Set up an image scanning workflow on Github
GitHub Actions is the feature that allows the automation of CI/CD software workflows directly in your Github Repositories. It borrows the name from the Actions, and automated tasks that are combined to create workflows. So our journey will start by creating and configuring a new workflow.
From the Actions tab, select the Skip this and set up a workflow yourself link:
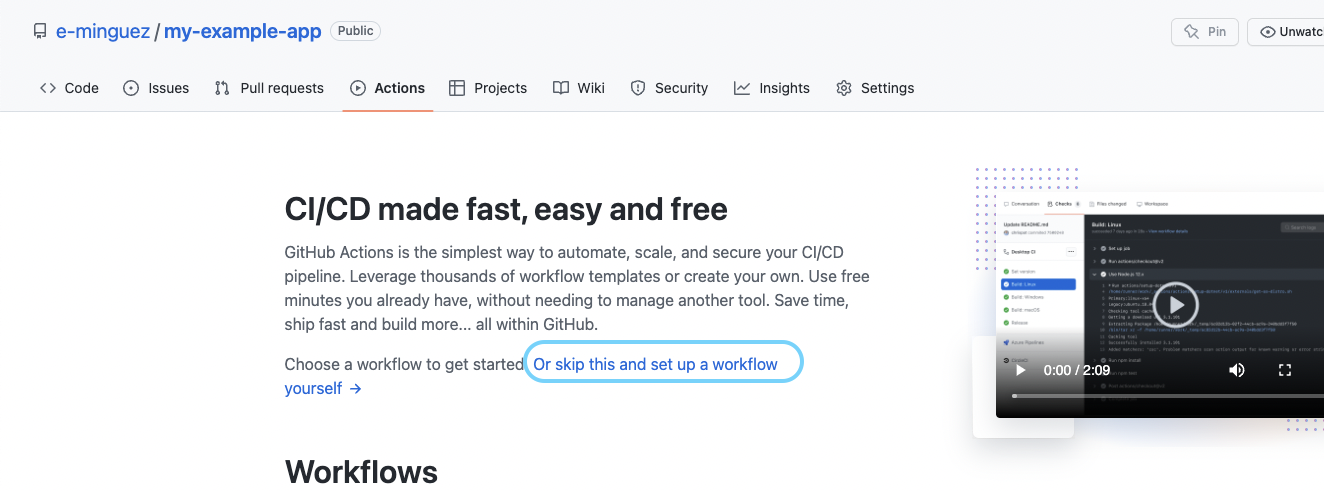
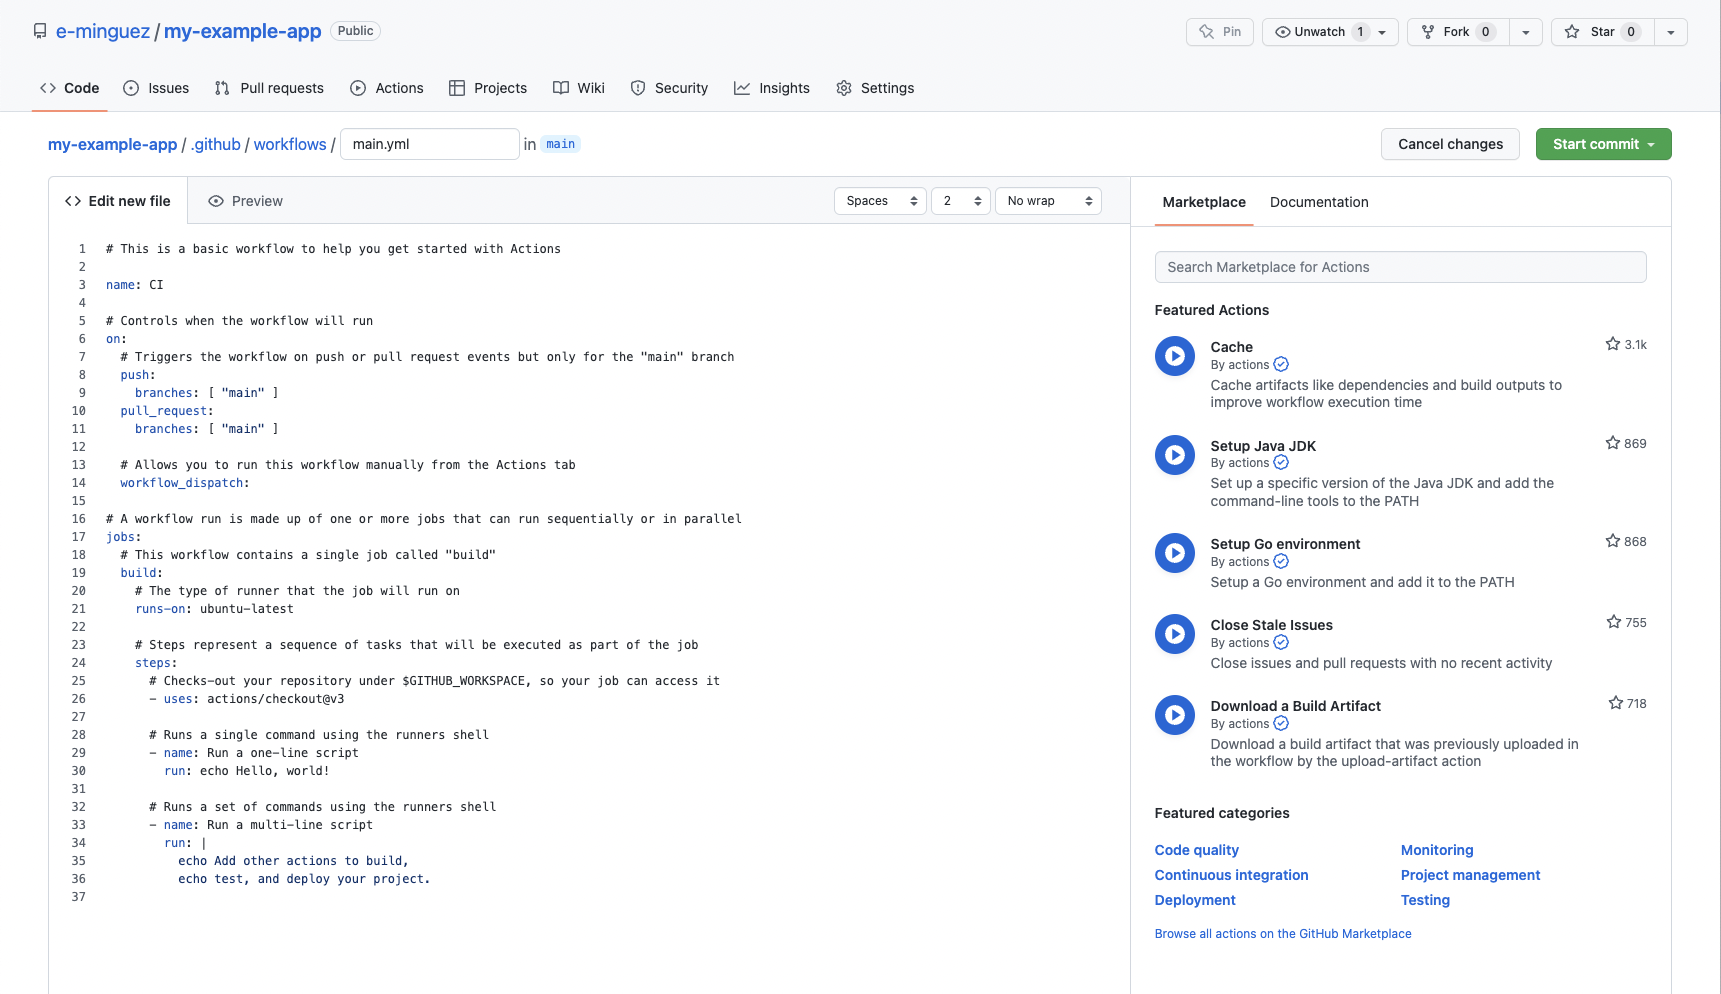
You’ll be presented with a default workflow like this:
GitHub Actions workflows are defined by YAML files in the .github/workflows/ directory inside your repository. That means that there is no need to go through the Actions UI. You can create a new workflow without taking your hands off the keyboard by simply adding .github/workflows/my-shiny-workflow.yml into your repository, then committing and pushing the changes. For more details about using GitHub Actions, check the official documentation.
You can see the whole example workflow in the sysdiglabs/secure-inline-scan-examples repository.
Let’s change the default main.yml name to something more appropriate, like build-scan-and-push.yaml, and edit the workflow YAML in the embedded editor to use the following steps:
env:
    SYSDIG_SECURE_ENDPOINT: "https://eu1.app.sysdig.com"
    REGISTRY_HOST: "quay.io"
    IMAGE_NAME: "mytestimage"
    IMAGE_TAG: "my-tag"
    DOCKERFILE_CONTEXT: "github/"
name: Container build, scan and push
on: [push, pull_request]

jobs:
  build-scan-and-push:
    runs-on: ubuntu-latest
    steps:
    - name: Checkout
      uses: actions/checkout@v2

    - name: Set up Docker Buildx
      uses: docker/setup-buildx-action@v2

    - name: Build and save
      uses: docker/build-push-action@v3
      with:
        context: ${{ env.DOCKERFILE_CONTEXT }}
        tags: ${{ env.REGISTRY_HOST }}/${{ secrets.REGISTRY_USER }}/${{ env.IMAGE_NAME }}:${{ env.IMAGE_TAG }}
        load: true
We are first defining a few environment variables that contain some parameters that will be used later on, including the API endpoint where the scanner results are sent (see the official documentation for more information about this and where to find yours) and the registry details where the image will be pushed.
Then we define a Workflow named “Container build, scan and push” (that is the name that will be displayed in the Actions UI in your repository). The workflow is triggered every time a push or pull request happens in the repo, and we are defining a job with job_id build-scan-and-push that runs-on an ubuntu-latest runner hosted by GitHub, and executes a list of steps, sequentially. Of course, there are many types of triggers available. You can execute multiple jobs in parallel and define dependencies and data flow between jobs. Additionally, you can execute on different types of workers, including your self-hosted runners, and much more.
Let’s review the first three steps:
- The first step named “Checkout” uses the action
actions/checkout@v2, which you can find on https://github.com/actions/checkout, to make our repository code available in the runner. - The second, named “Set up Docker Buildx,” is using the
docker/setup-buildx-action@v2official Docker action to prepare the environment to build container images (see https://github.com/docker/setup-buildx-action for more information about this particular action). - The third, “Build and save,” is using the
docker/build-push-action@v3official Docker action to build the container image and store it locally. It doesn’t push the image to the registry yet, it will be pushed later if the scan is successful (see https://github.com/docker/build-push-action for more information). It uses the environment variables we configured before (for example${{ env.DOCKERFILE_CONTEXT }}), as well as the secrets (for example${{ secrets.REGISTRY_USER }}).
Let’s skip the “Setup cache” and the “Download sysdig-cli-scanner if needed” for now and focus on the image scanning, by adding:
    - name: Scan the image using sysdig-cli-scanner
      env:
        SECURE_API_TOKEN: ${{ secrets.SECURE_API_TOKEN }}
      run: |
        ${GITHUB_WORKSPACE}/cache/sysdig-cli-scanner \
          --apiurl ${SYSDIG_SECURE_ENDPOINT} \
          docker://${REGISTRY_HOST}/${{ secrets.REGISTRY_USER }}/${IMAGE_NAME}:${IMAGE_TAG} \
          --console-log \
          --dbpath=${GITHUB_WORKSPACE}/cache/db/ \
          --cachepath=${GITHUB_WORKSPACE}/cache/scanner-cache/
This is a simple command execution where we run the sysdig-cli-scanner binary to scan the image. Let’s see the parameters in more detail:
--apiurl ${SYSDIG_SECURE_ENDPOINT}: The Sysdig API endpoint where the scan results are sent as well as the databases are downloaded.docker://${REGISTRY_HOST}/${{ secrets.REGISTRY_USER }}/${IMAGE_NAME}:${IMAGE_TAG}The container image that was built in the previous step and was stored locally in the container cache.--dbpath=${GITHUB_WORKSPACE}/cache/db/: The path where the vulnerability database is stored (more about this later).--cachepath=${GITHUB_WORKSPACE}/cache/scanner-cache/: The path where the scanner caches are stored (more about this later).- Also, the
${{ secrets.SECURE_API_TOKEN }}secret is converted into an environment variable to make it available to thesysdig-cli-scannerbinary.
Finally, let’s push the container image to the registry if the scan has been successful:
    -  name: Login to the registry
       uses: docker/login-action@v2
       with:
        registry: ${{ env.REGISTRY_HOST }}
        username: ${{ secrets.REGISTRY_USER }}
        password: ${{ secrets.REGISTRY_PASSWORD }}
    - name: Push
      uses: docker/build-push-action@v3
      with:
        context: ${{ env.DOCKERFILE_CONTEXT }}
        push: true
        tags: ${{ env.REGISTRY_HOST }}/${{ secrets.REGISTRY_USER }}/${{ env.IMAGE_NAME }}:${{ env.IMAGE_TAG }}
Those two steps are straightforward. The first one will log into the registry and the second one just pushes the previous container image that was built before to the proper registry.
Caching
Someone will ask themselves, where is the sysdig-cli-scanner binary stored? And the answer is it is downloaded from Sysdig the first time, then it is cached unless there is a new version of that binary available.
How is that so? Let’s see:
    - name: Download sysdig-cli-scanner if needed
      run:  |
        curl -sLO https://download.sysdig.com/scanning/sysdig-cli-scanner/latest_version.txt
        mkdir -p ${GITHUB_WORKSPACE}/cache/db/
        if [ ! -f ${GITHUB_WORKSPACE}/cache/latest_version.txt ] || [ $(cat ./latest_version.txt) != $(cat ${GITHUB_WORKSPACE}/cache/latest_version.txt) ]; then
          cp ./latest_version.txt ${GITHUB_WORKSPACE}/cache/latest_version.txt
          curl -sL -o ${GITHUB_WORKSPACE}/cache/sysdig-cli-scanner "https://download.sysdig.com/scanning/bin/sysdig-cli-scanner/$(cat ${GITHUB_WORKSPACE}/cache/latest_version.txt)/linux/amd64/sysdig-cli-scanner"
          chmod +x ${GITHUB_WORKSPACE}/cache/sysdig-cli-scanner
        else
          echo "sysdig-cli-scanner latest version already downloaded"
        fi
This step is just a bash script that checks the latest version of the sysdig-cli-scanner. If it is different from the one already available in the environment, it is downloaded (it also creates the database folders if they don’t exist).
Okay, but every workflow execution is stateless, how do you save that file? The answer is by using the cache GitHub action. The cache is a space available to store things, such as library dependencies, assets, etc.
In this example, we will leverage that space to store not just the sysdig-cli-scanner binary, but also the vulnerability databases and other scanner assets:
    - name: Setup cache
      uses: actions/cache@v3
      with:
        path: cache
        key: ${{ runner.os }}-cache-${{ hashFiles('**/sysdig-cli-scanner', '**/latest_version.txt', '**/db/main.db.meta.json', '**/scanner-cache/inlineScannerCache.db') }}
        restore-keys: ${{ runner.os }}-cache-
This action needs to be executed before the download step to gather the data from the cache and it is executed automatically at the end of the workflow to store the assets as a result of the workflow execution.
The key and restore-keys settings are used to invalidate the cache if something changes and to store only the assets we want to save and restore. See the official documentation to learn more about this action.
You can see the whole example workflow in the sysdiglabs/secure-inline-scan-examples repository.
Image scanning on Github: Lights, camera, action!
Provided you have a Dockerfile in your repository and a valid Secure API token, the commit of the workflow you just created should trigger the execution of the Workflow, build the image, and scan it.
You can navigate to the Actions section of the repo to see the result of the Workflow execution:
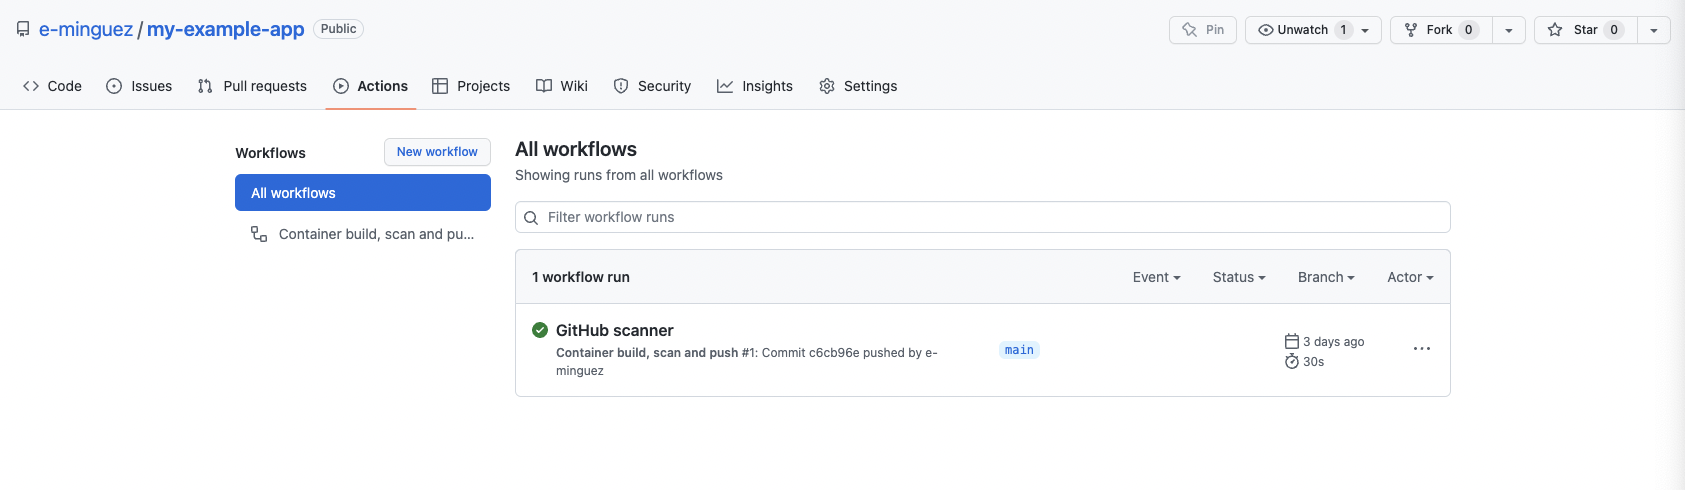
And click into the Workflow execution to get a detailed view of every step, get the logs, etc.:
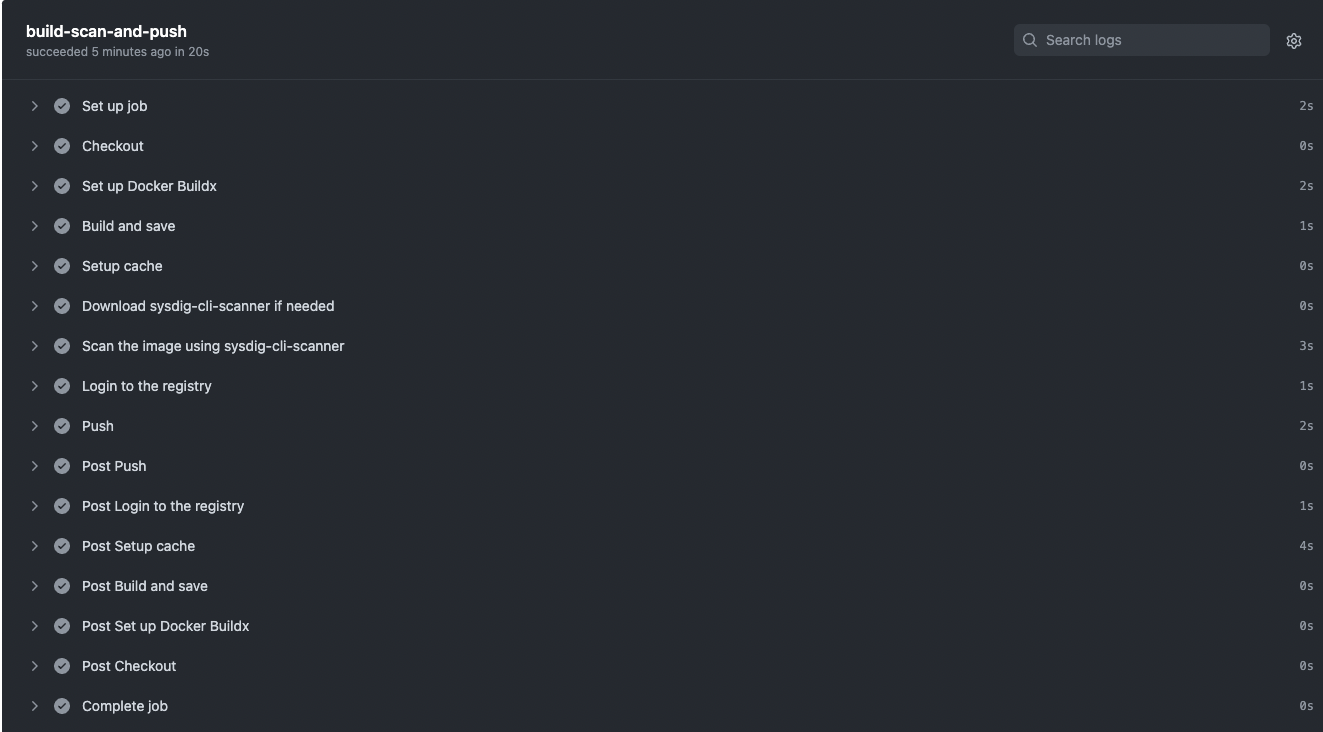
You can observe the “Post” steps are not included in our workflow but instead, they have been executed automatically, including the “Post Setup Cache” one to store the assets in the cache.
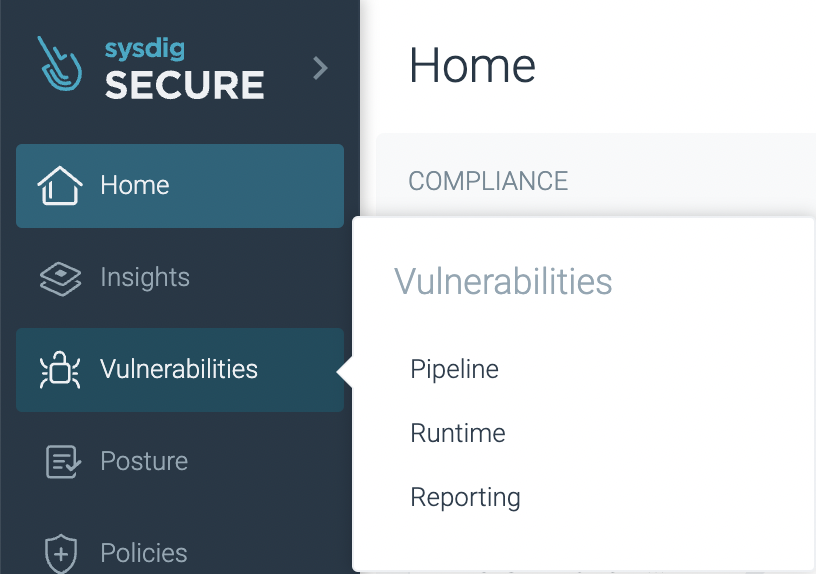
The analysis results are posted to your Sysdig Secure account under Vulnerability -> Pipeline:

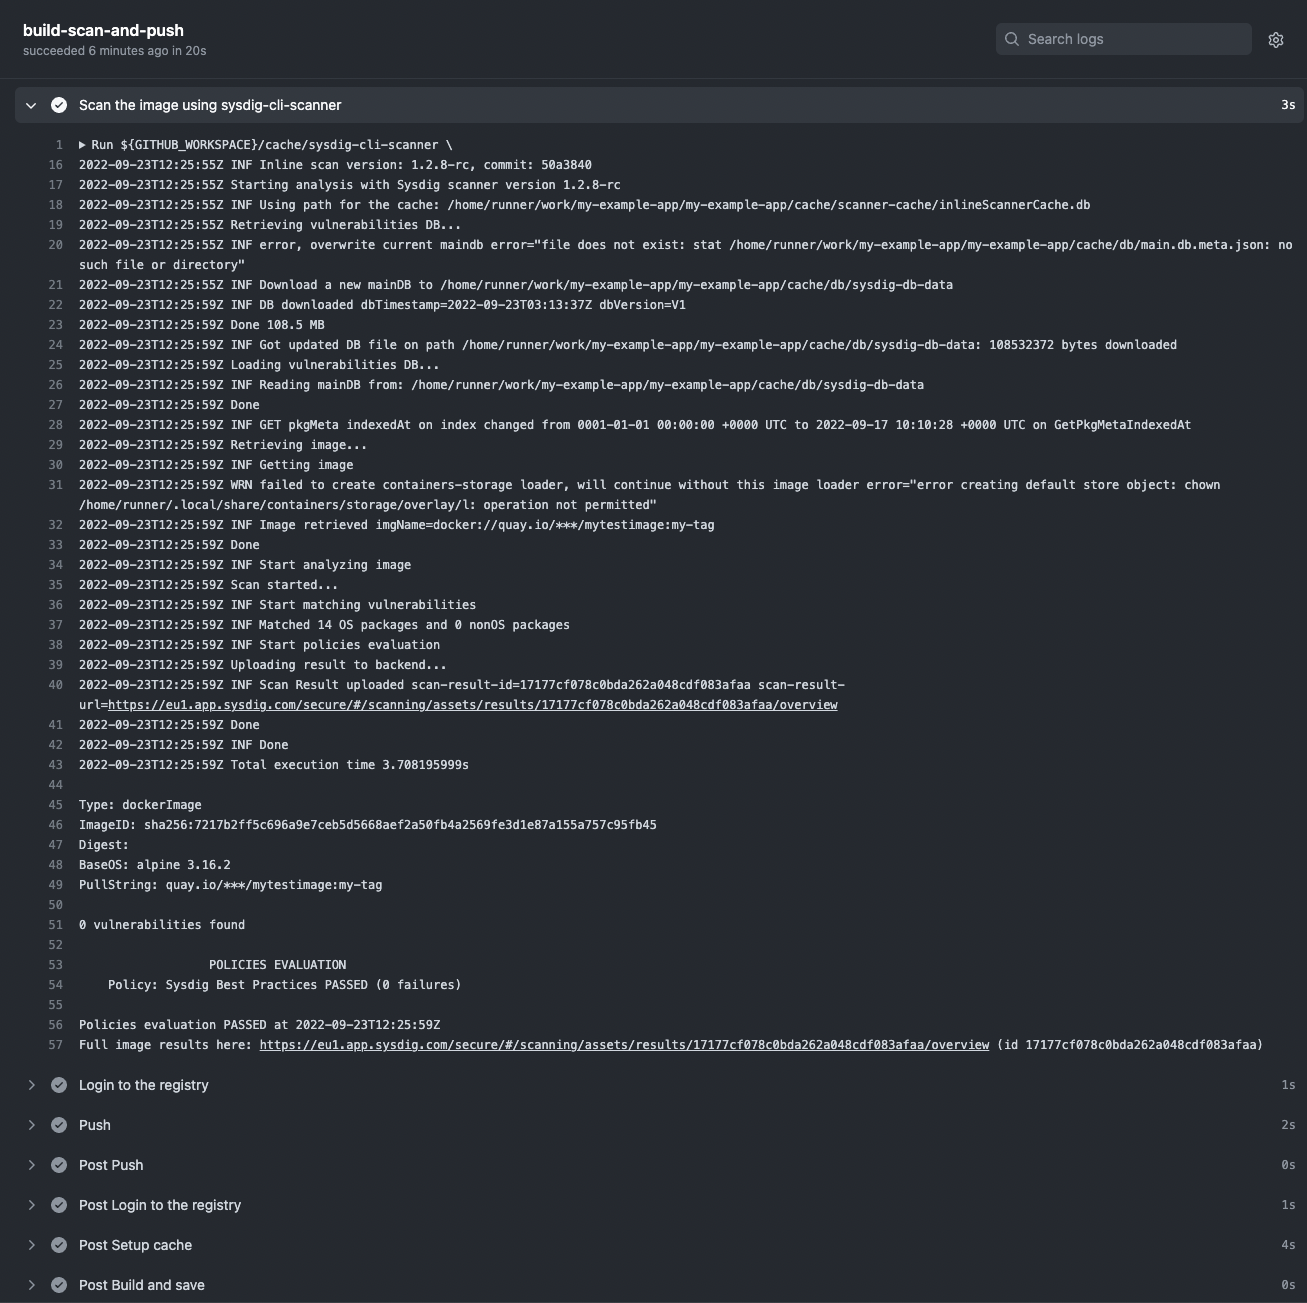
Success! No vulnerabilities were found, the image has been published by pushing it to the registry, and the assets are stored automatically in the cache for the next executions to save time and avoid unnecessary downloads.
This example scan used the default “Sysdig Best Practices” policy (you can see it on the logs), but you can create and customize the policies you want to check against. See the official documentation to learn more about how to create and customize policies, including not just vulnerability policies, but also image best practices.
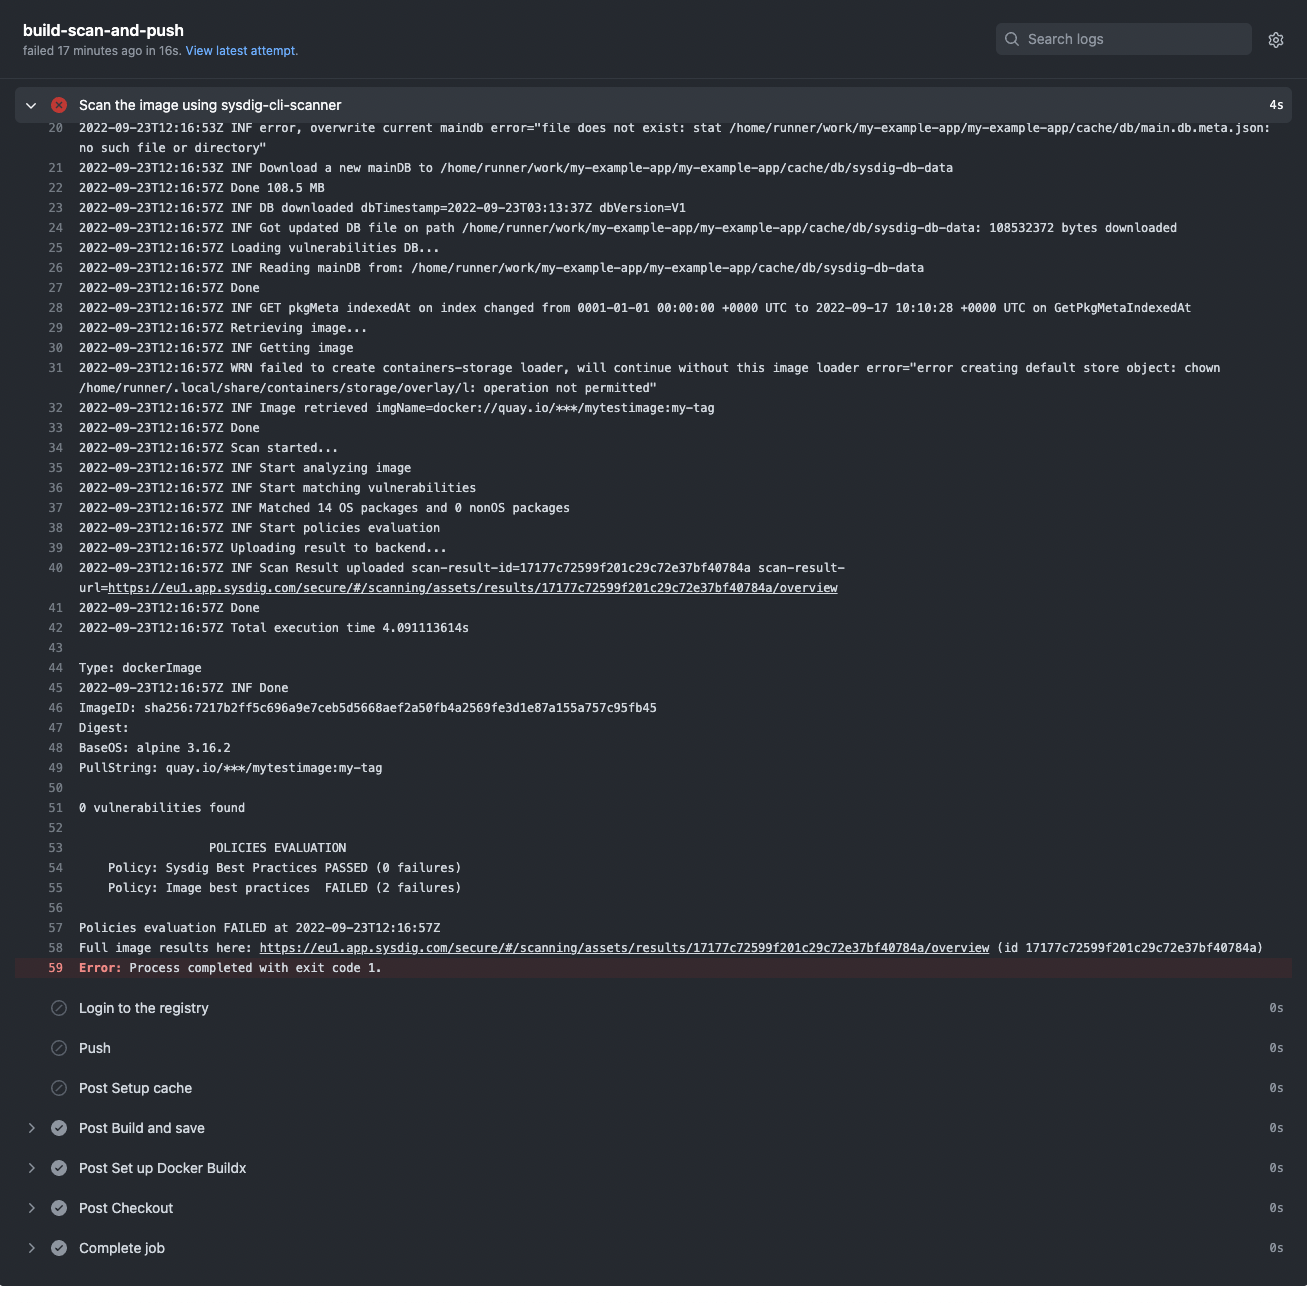
If the scan failed because a policy failed, the workflow stops and the image is not pushed to the registry (which is a good idea) as you can see here:
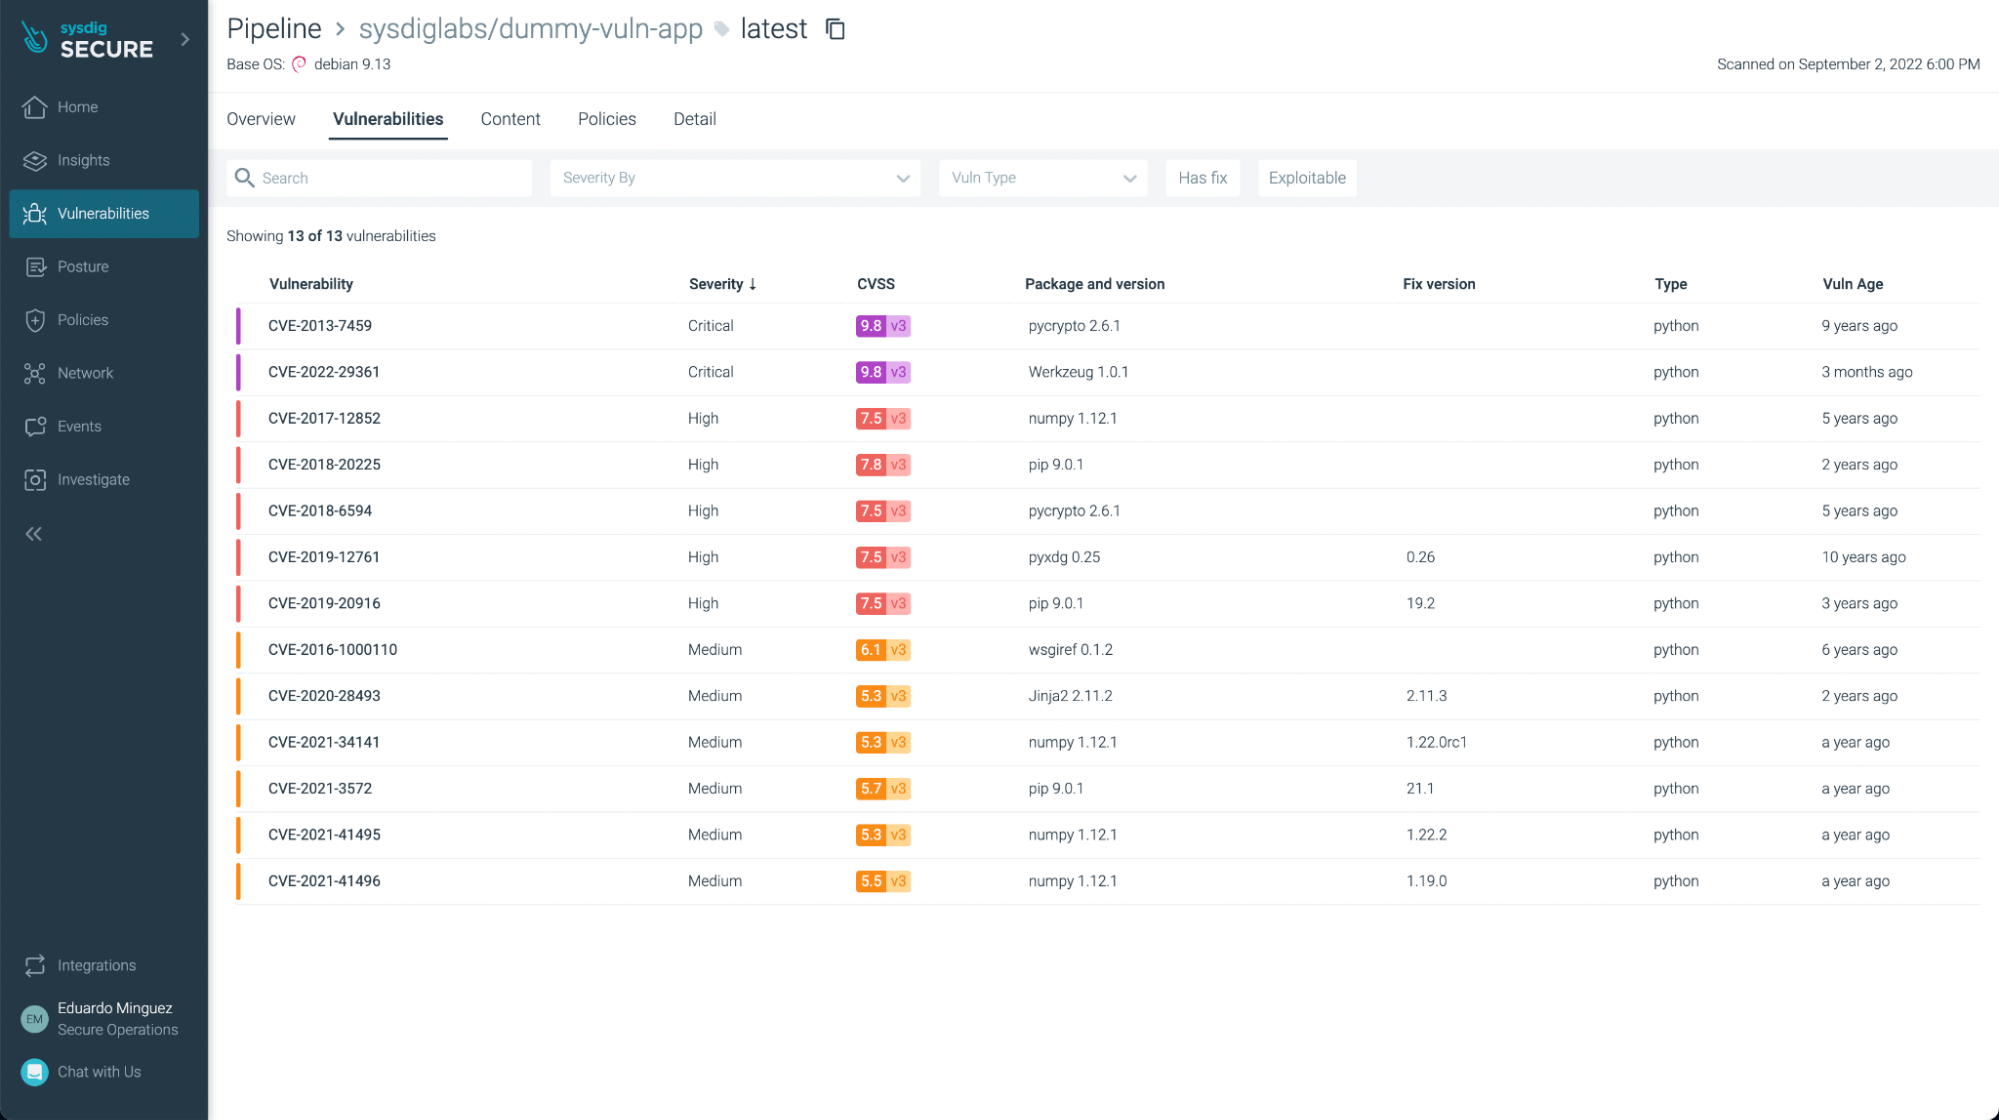
There weren’t any vulnerabilities found in this example (yay!), but if we look at another application, such as https://github.com/sysdiglabs/dummy-vuln-app, we can see some were discovered:
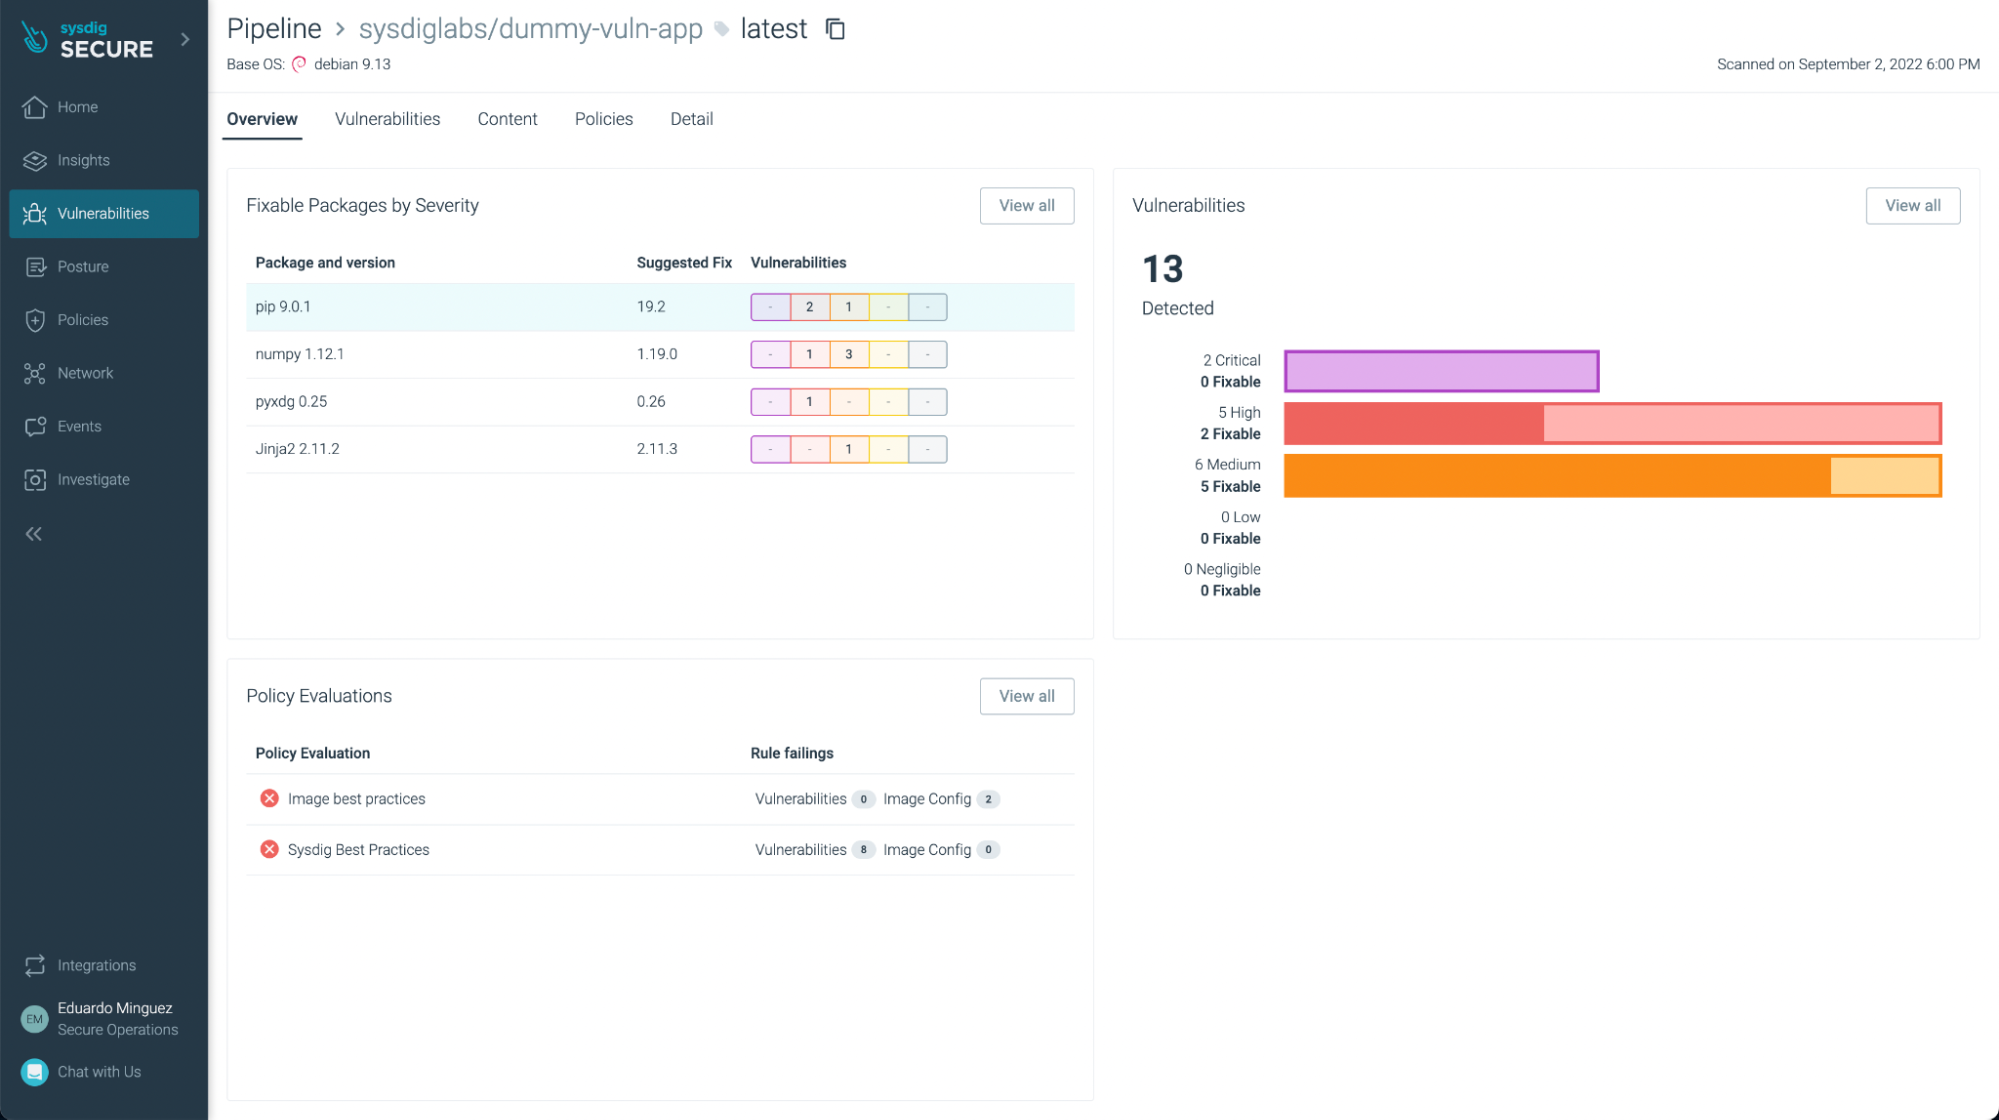
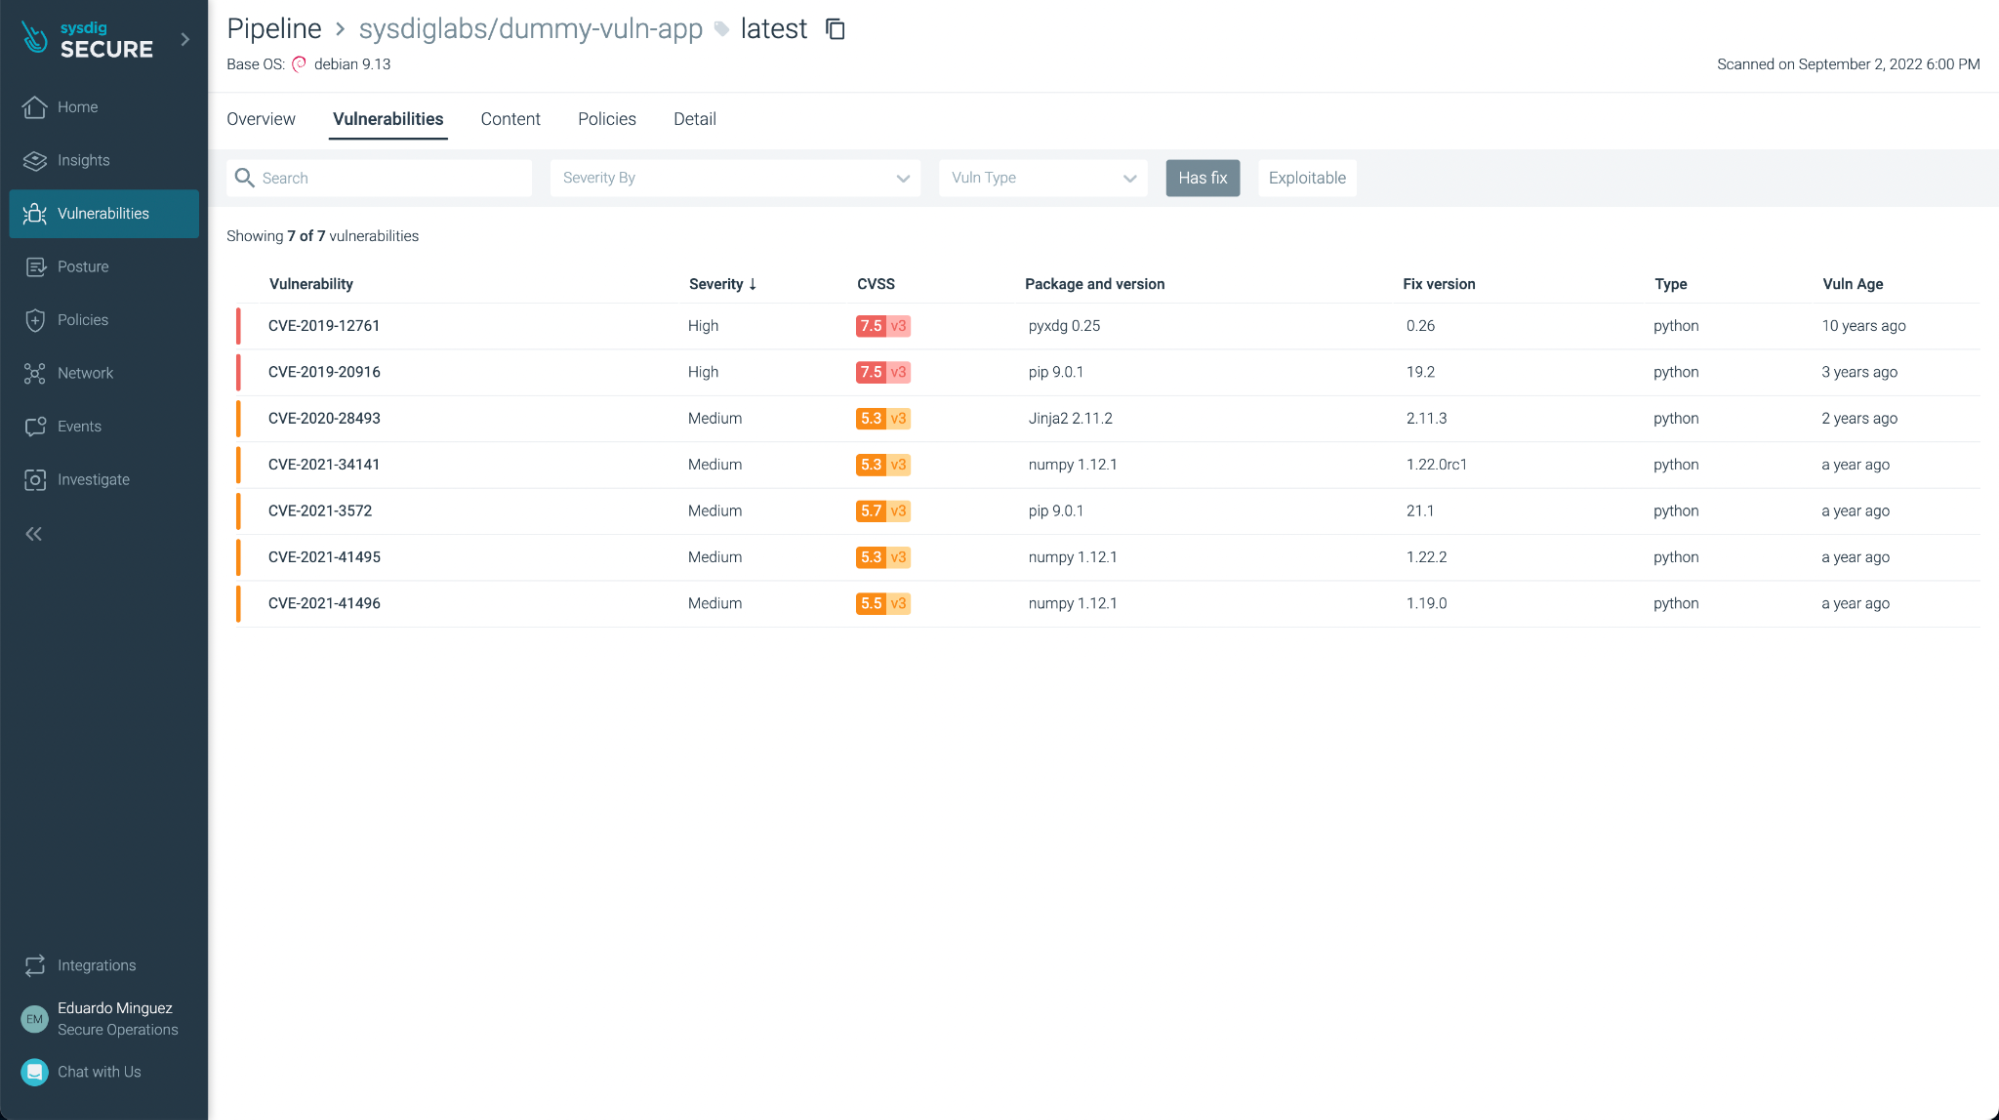
You can filter the ones that have fixes already and/or are exploitable, focusing on the most urgent ones to fix or update:
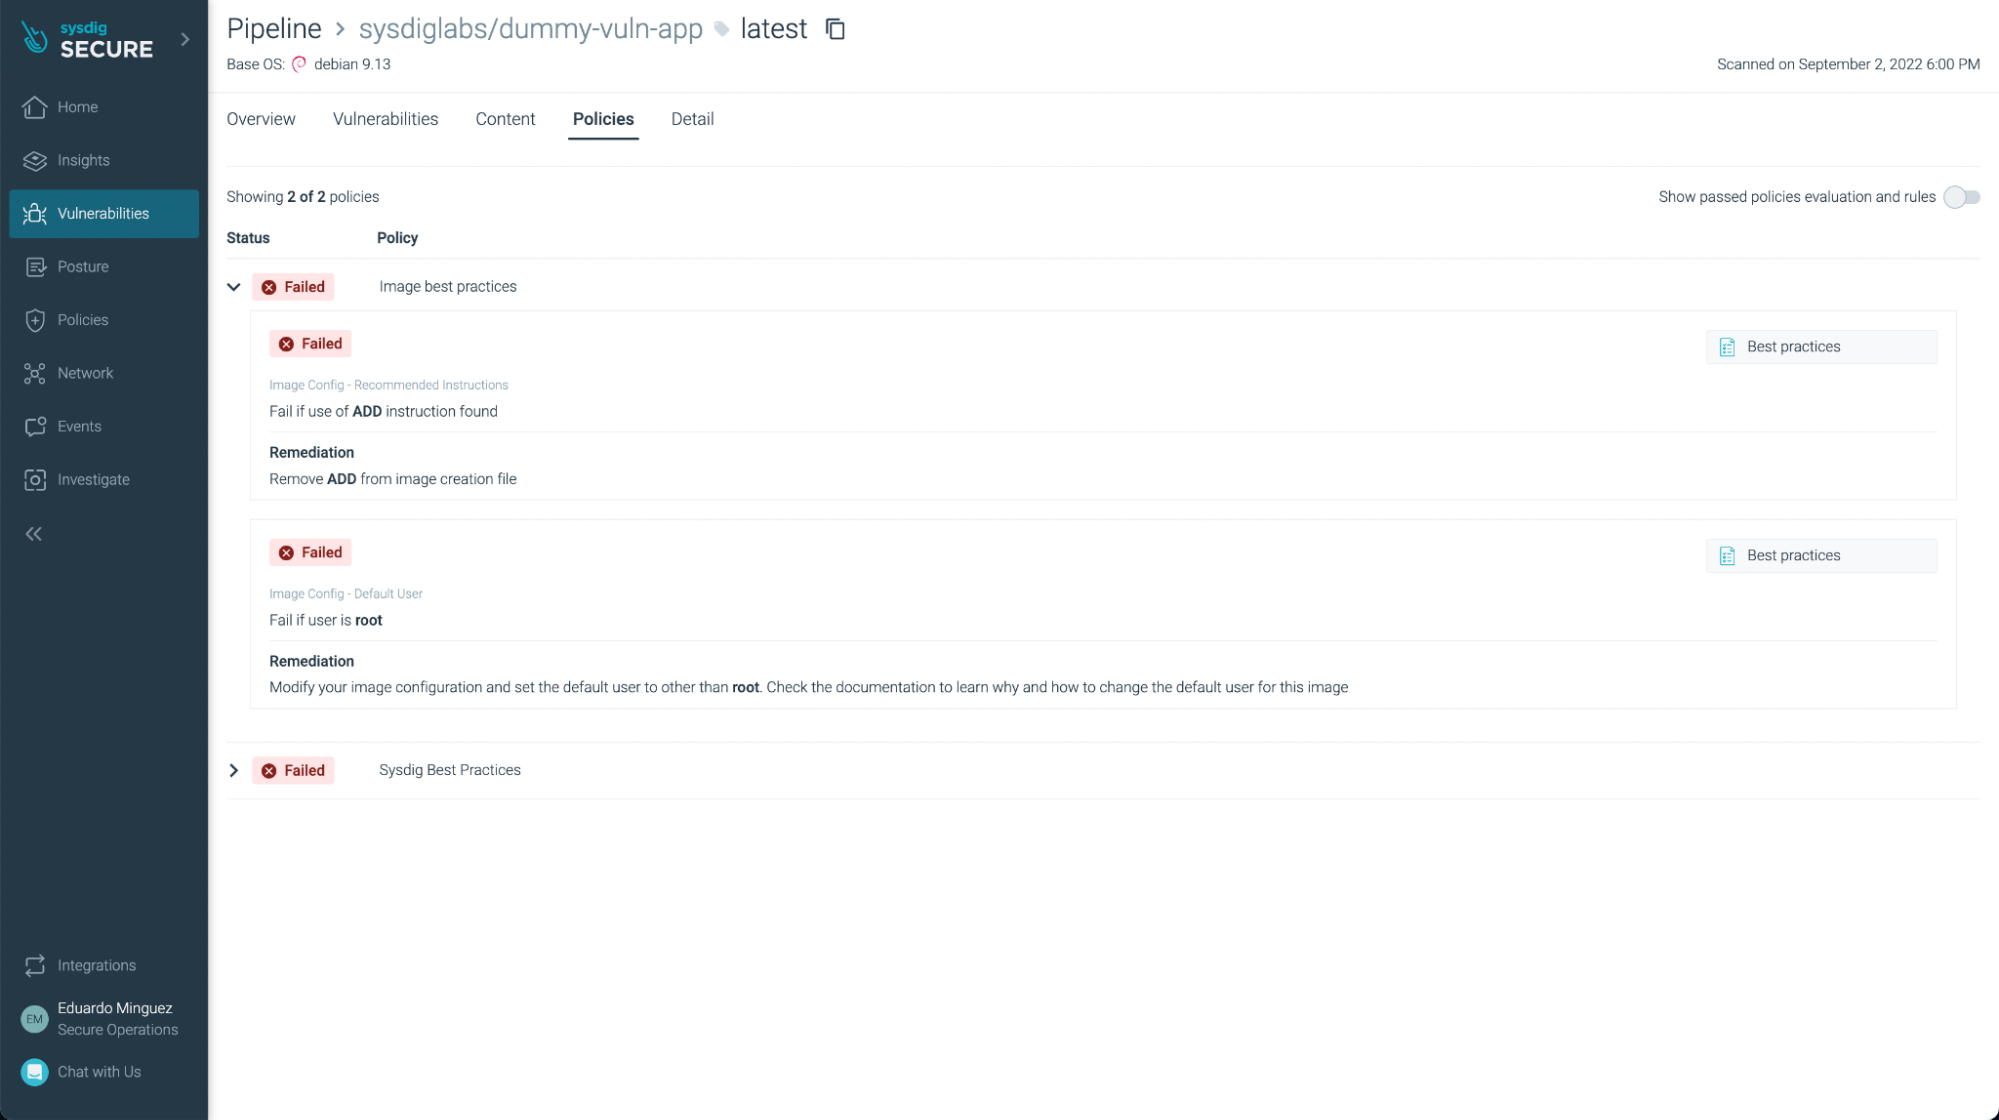
You can not only see vulnerabilities, but also some not best practices:
Conclusions
As you can see, GitHub Actions are a powerful tool to automate your CI/CD pipelines directly on your GitHub repository. Now, it is easy and straightforward to include the Sysdig container image scanning capabilities in your workflow, scanning images for vulnerabilities, enforcing best practices at build time, and providing several benefits over traditional image scanning within the registry:
- Implementing image scanning in the CI/CD pipeline means that if vulnerabilities are found, you prevent the image from being published at all.
- As analysis is performed inline (locally) in the runner, the image is not sent anywhere else, including outside of the environment in which it’s built. During the analysis, only metadata information, and not the actual contents, is extracted from the image.
- The metadata obtained from the analysis can be reevaluated later if new vulnerabilities are discovered or policies are modified without requiring a new scanning of the image for alerting. If you want to break the build, you still need to trigger a new scan within the build.
- Sysdig Secure provides out-of-the-box policies to enforce and adhere to various container compliance standards (like NIST 800-190 and PCI).
Sysdig Secure image scanning can be integrated seamlessly with most CI/CD pipeline tools.
If you are not using Sysdig Secure for scanning your images yet, wait no longer and request a demo now!