
Discover what registry scanning is, how it helps with shifting security left, and how you can implement it using Harbor and Sysdig.
Shifting security left is all about moving security to the earliest possible moment in the development process, dramatically improving “time to fix” and security impact. In this article, we’re going to show you how to shift left with Harbor registry and Sysdig Secure. You will learn how to transparently automate image scanning on every push to the registry.
Many organizations are already using CI/CD tools and following image scanning best practices to implement security checks as part of their development process, and that’s a great idea. The sooner you pinpoint a security issue in your container images, the faster you can fix it.
But what happens with those images you use but don’t own? They won’t pass through your CI/CD pipelines, and still, they might contain bugs or other security vulnerabilities. The ideal approach is to scan them directly as they are uploaded to the registry.
Harbor is an open source registry born at VMware. Subsequently, in 2018, the Harbor open source project became a CNCF hosted project. One of Harbor’s many cool features is its integration with third party scanning backends inside the core product. This leads to an awesome user experience without leaving the Harbor UI, and is also going to help us speed up our deployment cycle.
No image left unscanned with registry scanning! Learn how to implement image scanning right in the registry with Harbor and Sysdig. Click to tweetAutomated registry scanning as part of your secure pipeline
Even if you immediately scan every image that you produce via your CI/CD pipelines, you may face the following challenges:
- Not everyone is using the CI/CD tooling. Exceptions and workarounds happen, and you need to be prepared.
- You need to pull and deploy third-party images, which may contain known vulnerabilities.
- Many registries don’t directly attach scanning details to images. Developers need to look for the information elsewhere, creating a convoluted workflow that is prone to human error.
Registry scanning is another fundamental step to secure in your container lifecycle. Automating it will help you guarantee that it is always enforced, and integrating the scanning results directly into the registry UI will improve the developer’s user experience and reduce time to fix.
How Sysdig Secure pluggable scanning integrates with Harbor?
Harbor is a container registry heavily focused on security. It can protect its internal artifacts by implementing security policies and RBAC. It also has image scanning features and can be used to sign images as part of the trust chain.
On the other hand, the Sysdig Secure DevOps Platform helps you secure your workloads along the entire microservice life cycle: Image Scanning, Compliance, Run-time Security, and Forensic Analysis. In this article, we are just going to focus on the image scanning features.
Harbor defines an API spec to build adapters between Harbor and other image scanners. We have used it to build an adapter that allows the Harbor scanning API to communicate with the Sysdig Secure API to retrieve vulnerability reports and additional information. These details are then presented in the Harbor UI transparently to the end user.
This adapter has two operation modes: Backend and Inline scanning.
Backend scanning
This is the default mode. The Sysdig Harbor adapter will forward the container image path to the Sysdig Secure backend (either SaaS or on-prem), for example docker.io/alpine:latest. The backend will use this path to retrieve and scan the container image, providing the results back to the Sysdig Harbor adapter.
Pros:
- Easier to install.
Cons:
- The Sysdig Secure backend needs to have network visibility in order to fetch images from Harbor.
Inline scanning
Using inline scanning, the scanning operation itself will be triggered and performed on your own infrastructure. It spawns a Kubernetes job when a new image is pushed. This job will communicate only the container metadata to the Sysdig Secure backend, which performs the evaluation based on the configured image scanning policies.
Pros:
- No need to configure registry credentials in the Sysdig Secure backend.
- No need to expose your registry externally, so it can be reached by Sysdig Secure (see cons in the section above).
- Image contents are never transmitted outside the pipeline, just the image metadata.
Cons:
- The job performing the inline scanning needs to have access to the host-local Docker daemon.
Configuring registry scanning with Sysdig Secure and Harbor
To deploy the Harbor Scanner Adapter for Sysdig Secure, you will need the following requisites:
- A Sysdig Secure API Token
- Kubernetes >= 1.14
- Harbor >= 1.10
- Helm >= 3
Let’s go step by step.
Obtaining the Sysdig Secure API token
Once you have your Sysdig Secure account, you need to login and go to your settings. It is just below the Get Started sidebar item.
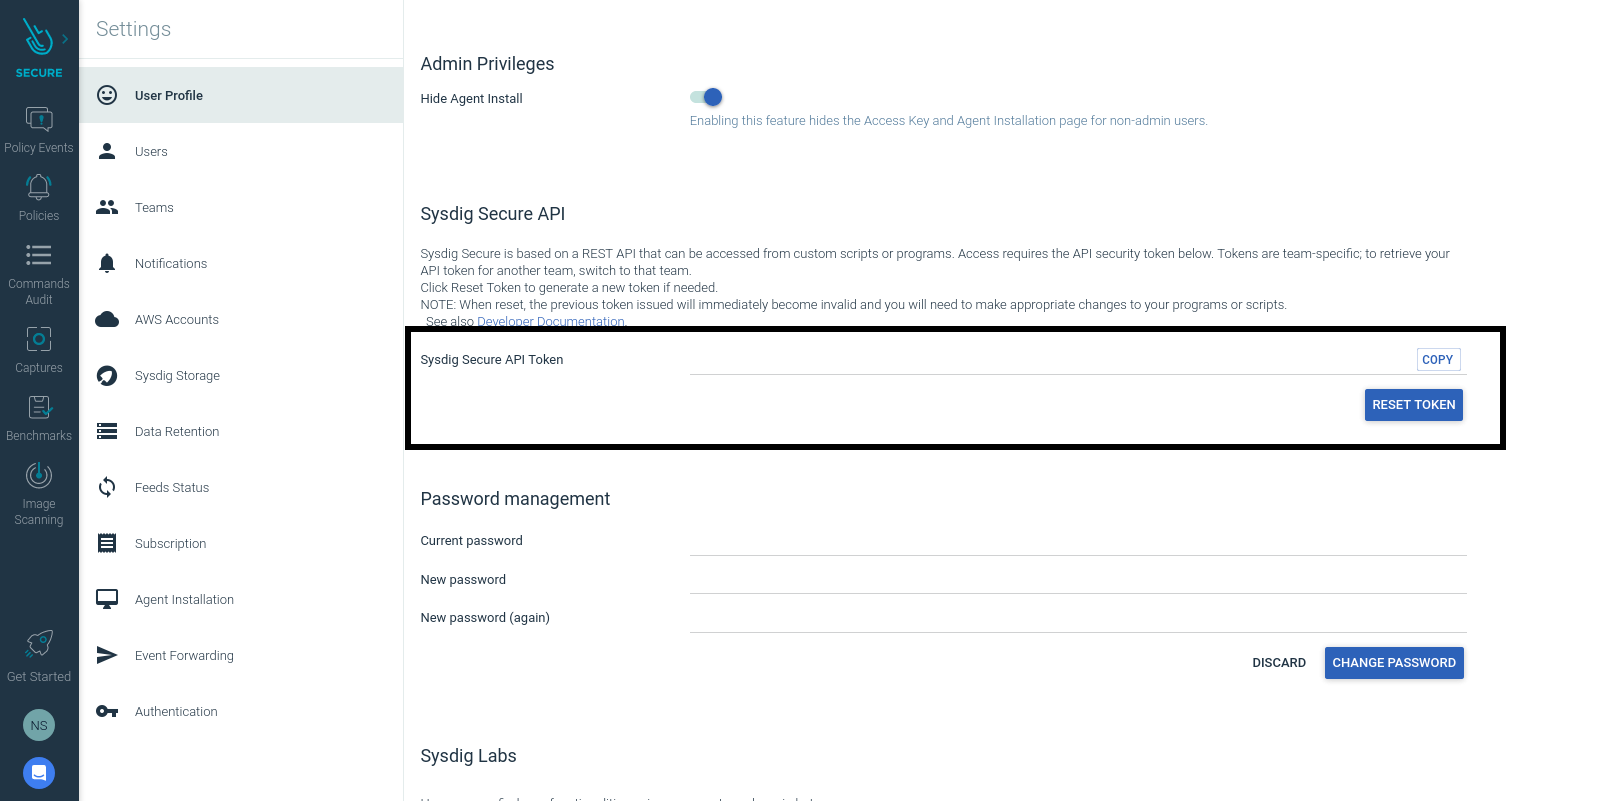
Please, copy that API token.
Deploying on Kubernetes using the Helm Chart
The fastest way to deploy the scanner adapter is using the Helm Chart we provide. In this article, we are going to focus on the inline scanning strategy. The backend scanning is even easier! :)
We are going to use a YAML file to keep track of these settings. Let’s call this file values.yaml:
sysdig:
  secure:
    apiToken: XXX
inlineScanning:
  enabled: true
We need to replace the XXX value to the correct one.
Remember how to get the Sysdig Secure API Token, and proceed to the next steps.
In case you are not using Sysdig SaaS in the default region, or using On-Prem, please set sysdig.secure.url with the correct value. See https://docs.sysdig.com/en/docs/administration/saas-regions-and-ip-ranges/ for more information. For example for European Union region:
sysdig:
  secure:
    apiToken: XXX
    url: https://eu1.app.sysdig.com
inlineScanning:
  enabled: true
Then, the next step is to deploy the scanner adapter:
$ helm repo add sysdiglabs https://sysdiglabs.github.io/charts
"sysdiglabs" has been added to your repositories
$ kubectl create namespace harbor-scanner-sysdig-secure
namespace/harbor-scanner-sysdig-secure created
$ helm -n harbor-scanner-sysdig-secure install harbor-scanner-sysdig-secure -f values.yaml sysdiglabs/harbor-scanner-sysdig-secure
NAME: harbor-scanner-sysdig-secure
LAST DEPLOYED: Tue Jun  9 13:38:12 2020
NAMESPACE: harbor-scanner-sysdig-secure
STATUS: deployed
REVISION: 1
NOTES:
1. Get the application URL by running these commands:
export POD_NAME=$(kubectl get pods --namespace harbor-scanner-sysdig-secure -l "app.kubernetes.io/name=harbor-scanner-sysdig-secure,app.kubernetes.io/instance=harbor-scanner-sysdig-secure" -o jsonpath="{.items[0].metadata.name}")
echo "Visit http://127.0.0.1:8080 to use your application"
kubectl --namespace harbor-scanner-sysdig-secure port-forward $POD_NAME 8080:80
And voilá, the scanner is deployed. It’s time to tell Harbor to use it.
Configuring Harbor to use the Sysdig Secure Scanner Adapter
Once the Helm Chart is deployed, configure Harbor to use the scanner adapter. You need to add it under Interrogation Services. Click on the New Scanner button and fill the details:
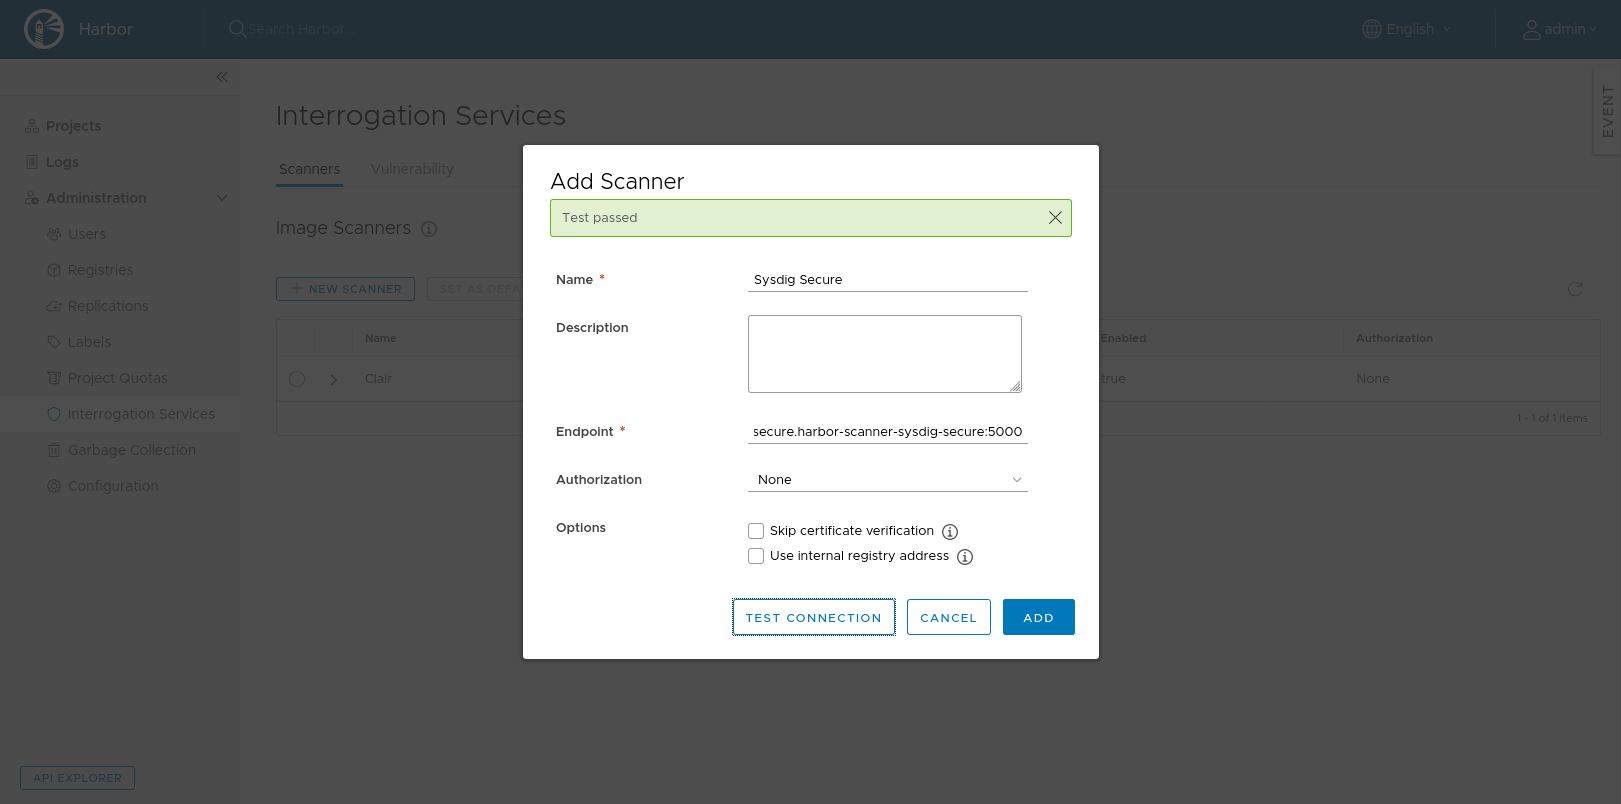
Use the service that the Helm Chart creates as an endpoint, and to make sure it can be reached click on the Test Connection button.
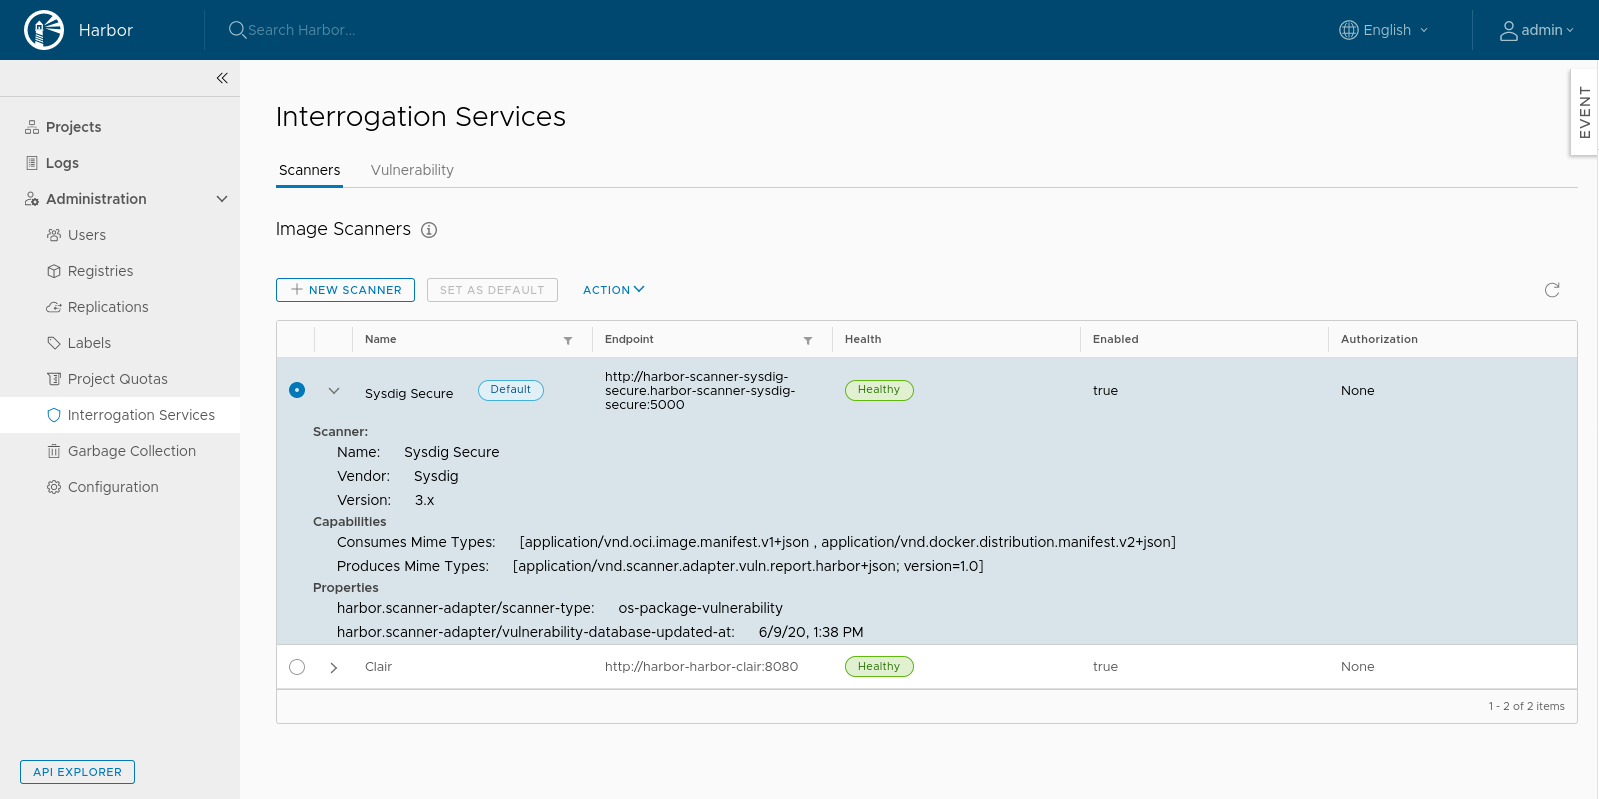
Finally, select the Sysdig Secure scanner and set it as default. You can check that you have done it right by looking for the Default label next to the scanner name.
Registry scanning example flow
Once we have the Sysdig Secure scanner configured in Harbor, we can start using it to scan the images pushed to the repository on every push:
$ docker pull ruby:2.7-slim
2.7-slim: Pulling from library/ruby
bf5952930446: Pull complete
d442c4e44ebb: Pull complete
f68297cfdb9c: Pull complete
18d9c380f08f: Pull complete
12ce7815f9ad: Pull complete
Digest: sha256:eedd564475dafa9c65924d76a4d7b0e65a543583c762e02fe83712325479a6b0
Status: Downloaded newer image for ruby:2.7-slim
docker.io/library/ruby:2.7-slim
$ docker tag ruby:2.7-slim  harbor.sysdig-demo.zone/harbor/ruby:2.7-slim

$ docker push harbor.sysdig-demo.zone/harbor/ruby:2.7-slim
The push refers to repository [harbor.sysdig-demo.zone/harbor/ruby]
f61b37166fa2: Pushed
55d1859e48a3: Pushed
a41749bfbcf8: Pushed
3f65f6a3d78a: Pushed
d0f104dc0a1f: Pushed
2.7-slim: digest: sha256:634050fda844344d4caa4760de8c40b963870b34b4afbf09d52abf19f54ec343 size: 1367
In this example, we are pulling ruby:2.7-slim from DockerHub. We tag it to upload to harbor.sysdig-demo.zone/harbor repository and finally, we push the image to our Harbor repository.
We immediately see the image in the Harbor interface and after a few minutes, we get the vulnerability report available in the Harbor UI.
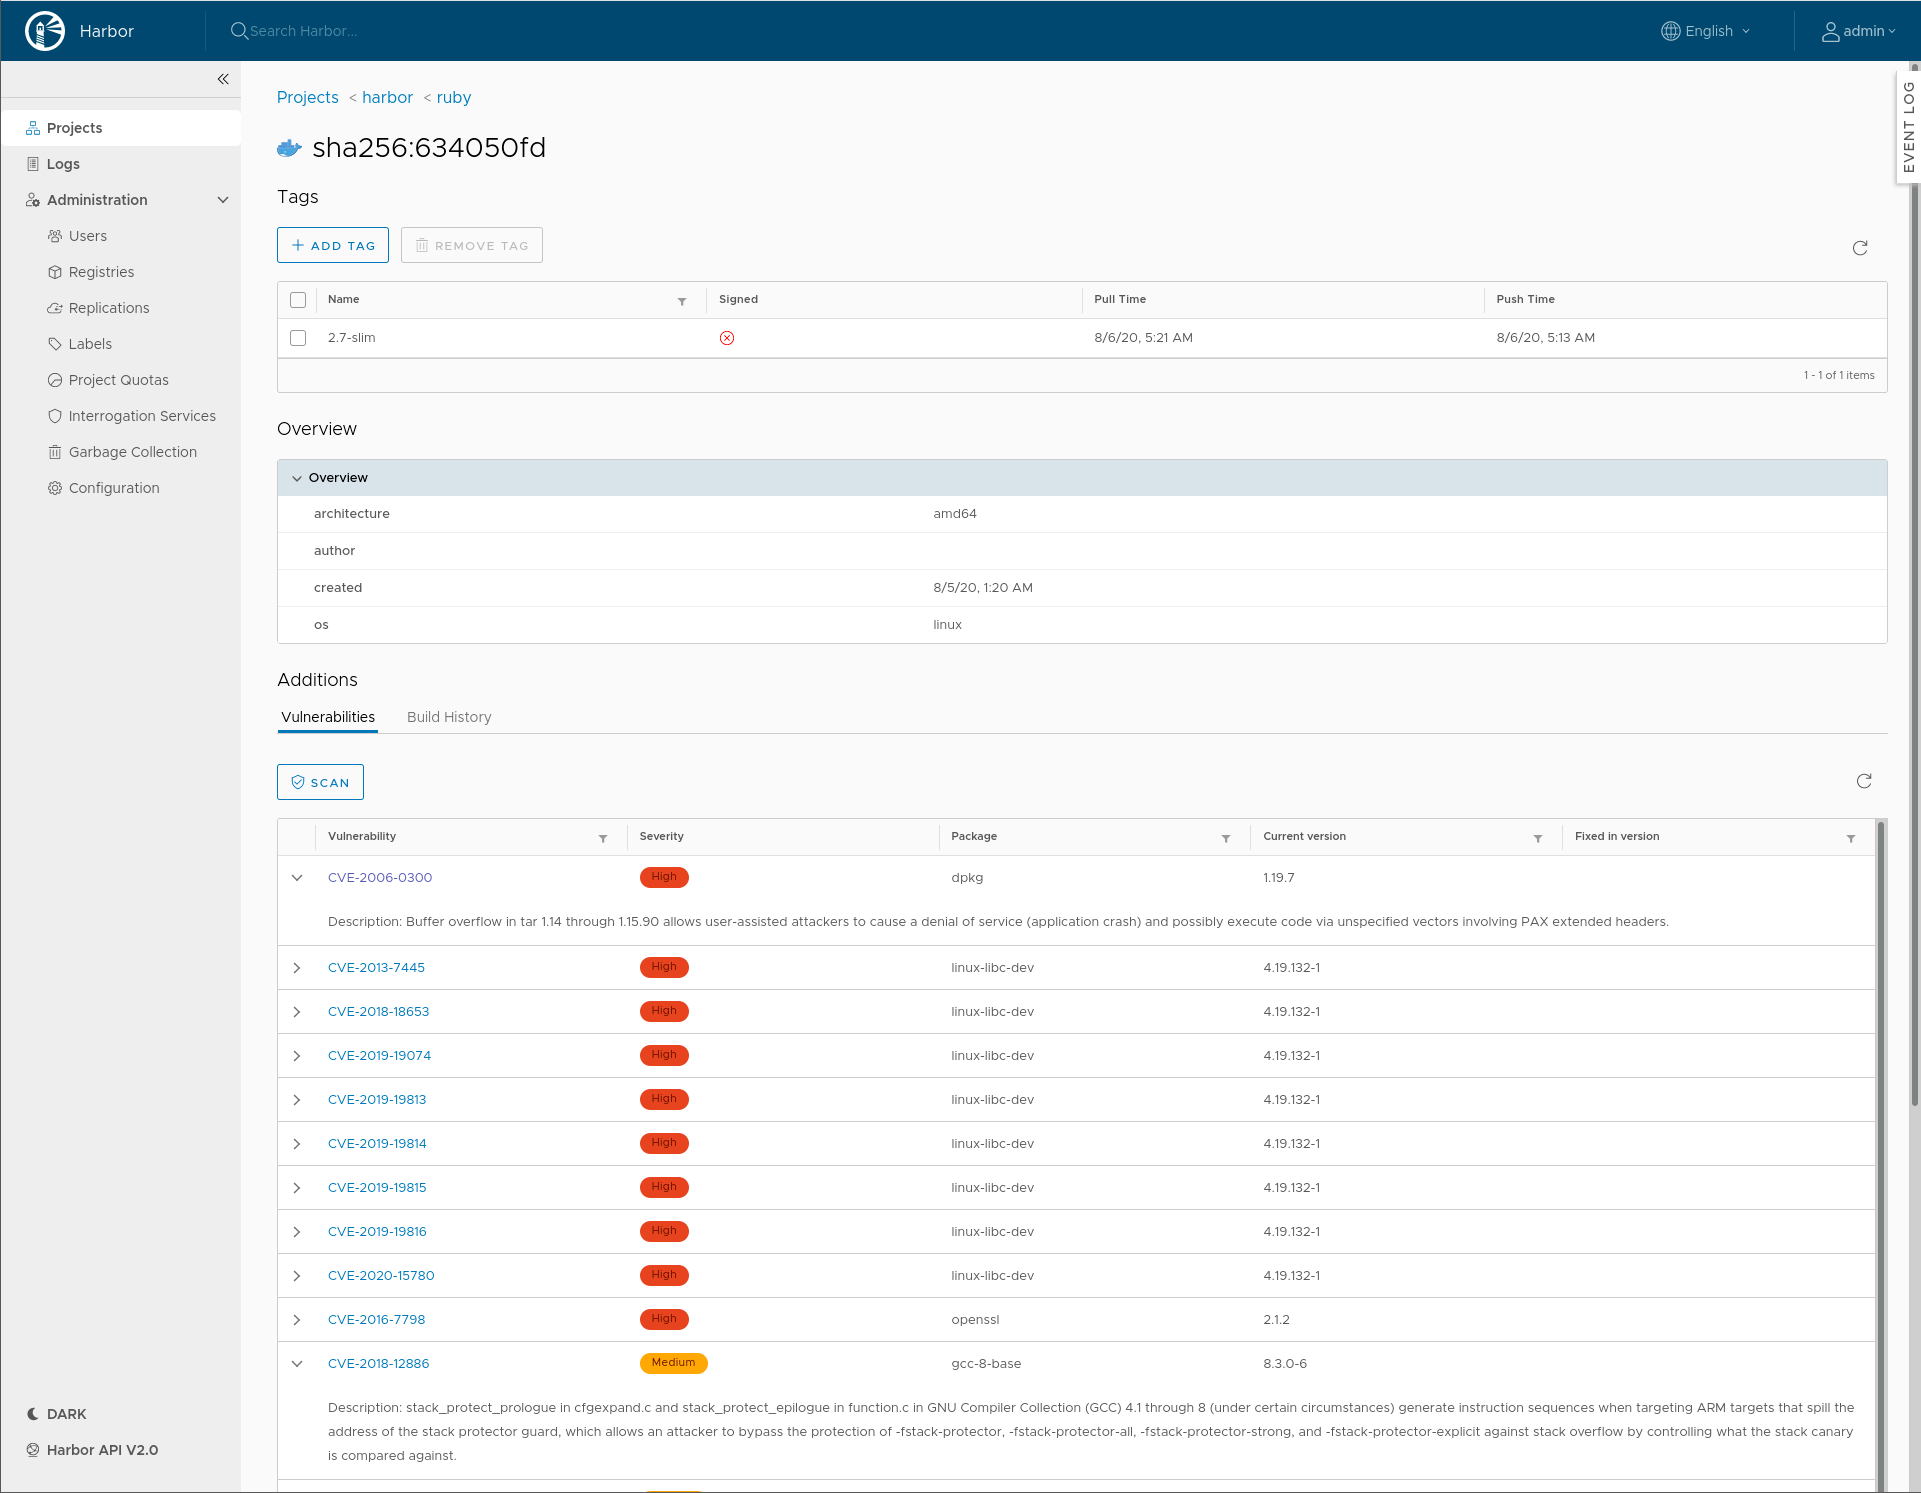
We can expand the CVEs to see a detailed description of the vulnerability and we can reorder the data by clicking on the table headers.
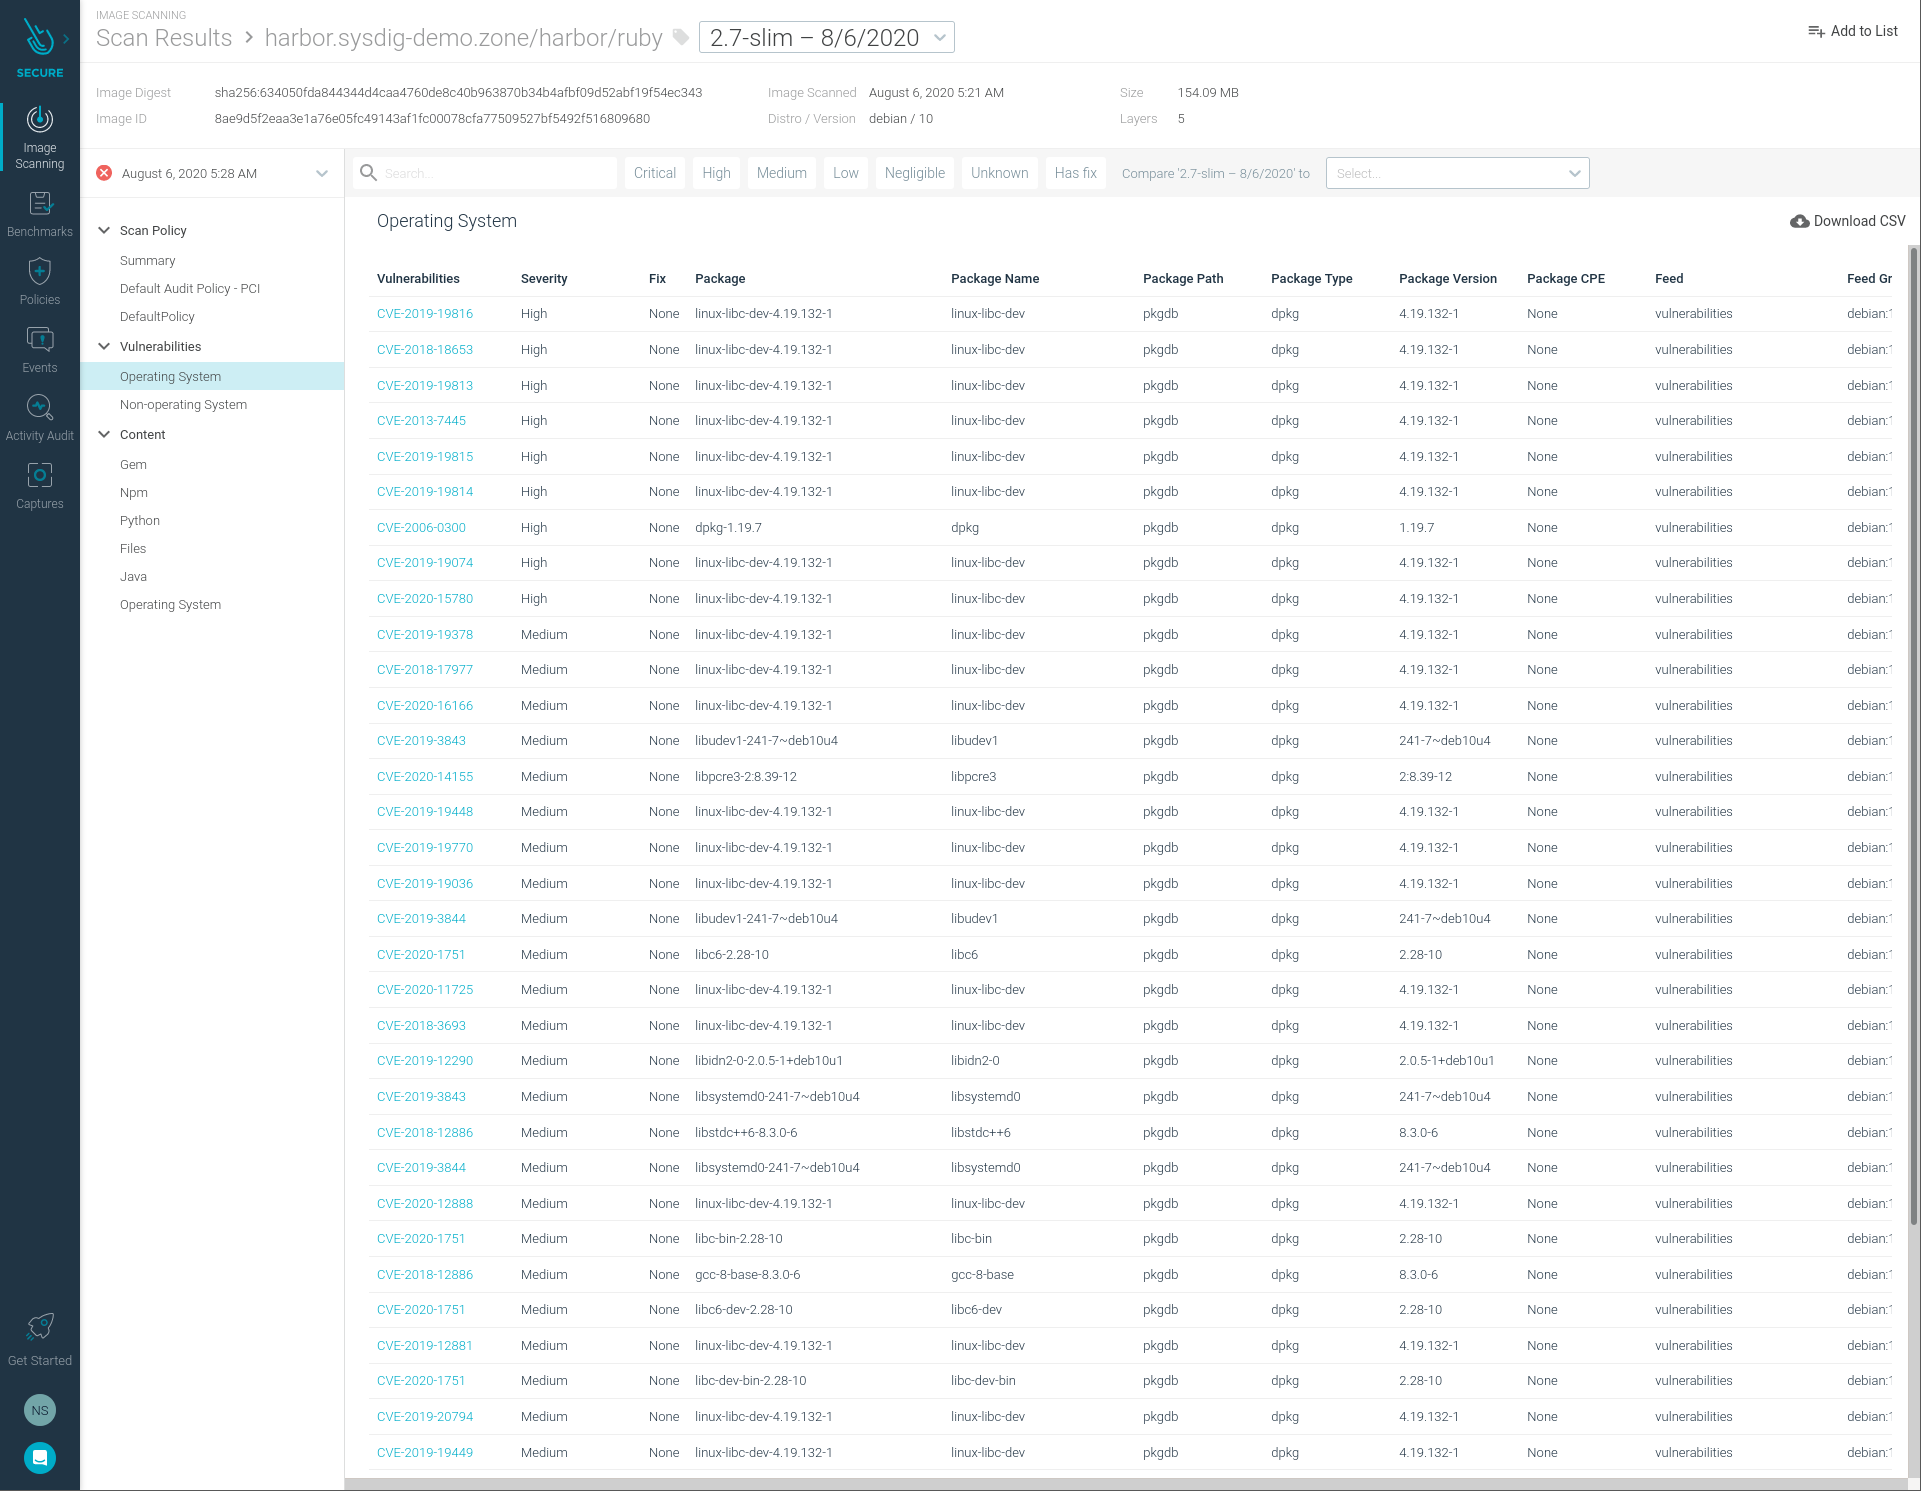
In the next screenshot, we can see the same vulnerabilities that we already saw in the Harbor UI, but now inside of the Sysdig Secure UI.
Conclusion
Thanks to Harbor pluggability and flexibility, implementing automated registry scanning is easy to achieve in just a few minutes. Automated registry scanning is a prime example of security in layers and shifting security left.
Now you have completed another step in your 12 container image best practices and you are closer to a fully secured pipeline :).
The code for this integration is open and available in GitHub and you only need a Harbor deployment and a Sysdig Platform free trial to get started. Do try this at home!